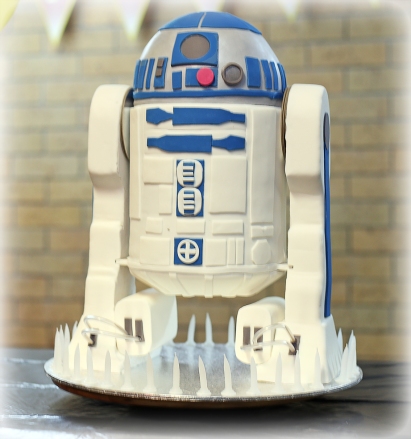
I made this cake for Slade’s 1st birthday and his Mum didn’t want anything too scary so no skull and cross bones on this cake. It was fun to make the cake and like many of my cakes I didn’t have any idea how it would turn out and just made decisions as to style and colour as I went along.
Some materials you will need
12″ of 7mm diam wooden dowelling for the mast 12″ square cake board 375g pale blue sugar paste to cover cake board 900g brown sugar paste to cover ship
Dark Chocolate Mud Cake Recipe
I used my recipe for a 9″ square cake but I actually used a 8.5″ pan so that the cake was taller than usual. 400g butter 325g dark chocolate 1.5 tblsp coffee granules 2 cups warm water 2.5 cups of Self raising flour 1.5 cups caster sugar 0.5 cups cocoa powder 3 large eggs 1.5 tsp vanilla
Method
1. Grease and line base and sides of cake pan with one thickness of baking paper, bringing paper 5cm above side of pan.
2. Combine chopped butter, chopped chocolate, coffee, and water in a saucepan.
Stir over low heat until chocolate is melted. Cool 15 minutes. Transfer mixture to bowl of mixer.
3. Add caster sugar to mixture and beat well until dissolved. Add sifted flour and cocoa, lightly beaten eggs and vanilla.
4. Pour mixture into prepared pan.
5. Bake at 150C for 1.5-2 hours . Test with skewer. Cool cake in pan.
Make the Dark Chocolate Ganache
although I am asking you to make a lot of ganache, you will need a lot to give the ship its bulging shape and any extra can be frozen till your next cake project.
1.9 kg dark chocolate, finely chopped 600ml pure cream
Method: Heat the cream until it just starts to bubble, pour over chocolate (which you have blitzed in the food processor to coffee granules size) and let it sit for about a minute to melt. Use a hand whisk to blend it all together then set aside to cool.
Your ganache at this point will be thin. You will have to let it set overnight until it thickens to a slightly thicker peanut butter consistency. Since I don’t have the patience to wait, I just let it cool to room temperature and then pop it in the fridge (don’t cover because you might get condensation). It would usually set in the fridge in about an hour or two. If it sets too hard, just microwave it in 10 second intervals (keep mixing it whenever you take it out) till it is easy to work with.
For more information on how to make ganache and cover your cake with it, please click here.
Set up Board
first of all measure out a rectangle 11 x 22 cm then round the corners off to make the ship template which will also be used as the set up board and the edge can be followed when ganaching..
Set up board
Once you are happy with the shape cut it out.
Building the ship
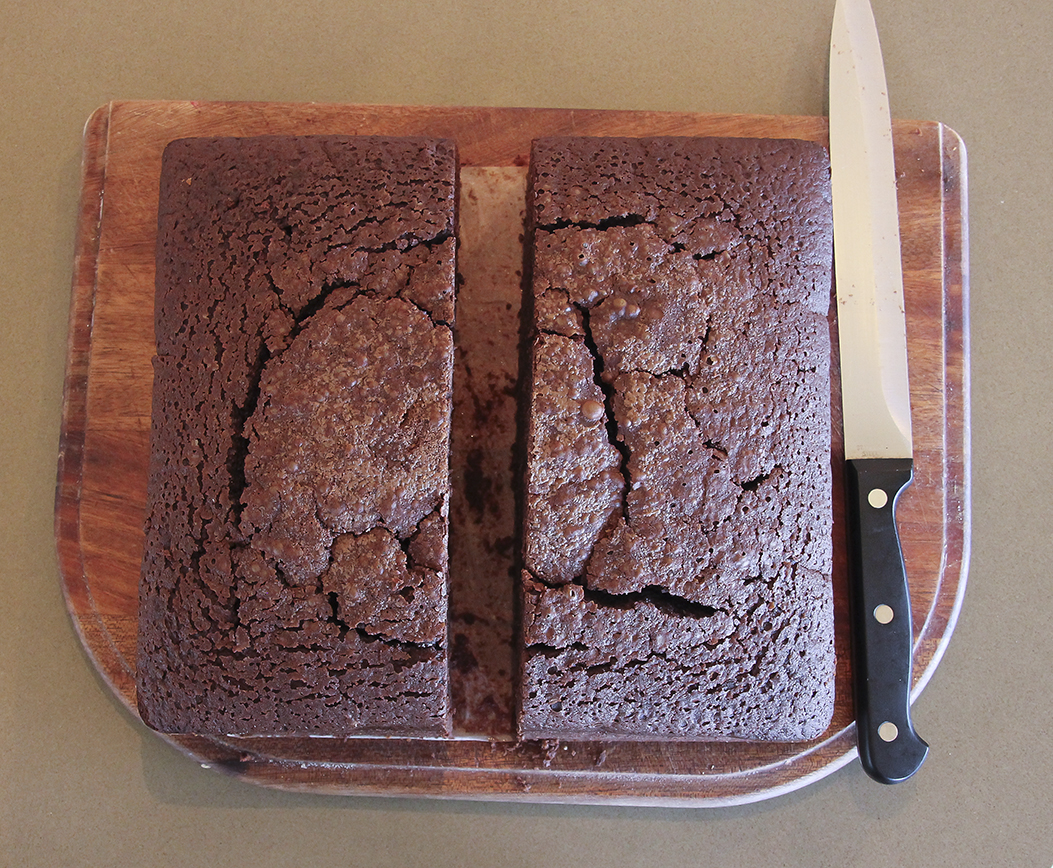
Cut the cake in half.
Cut cake in half
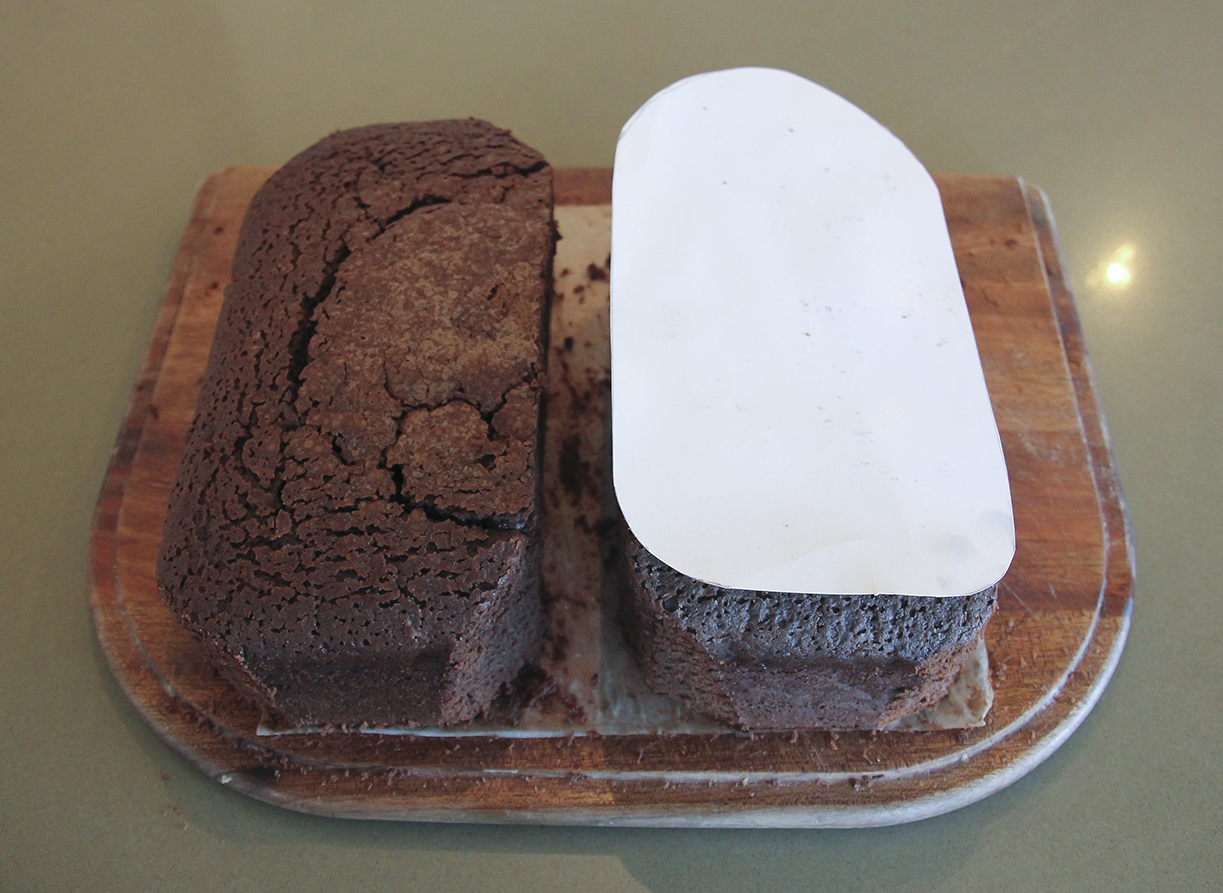
Use the template / set up board to cut out the hull shape on both halves of the cake.
Use the template to cut out the hull
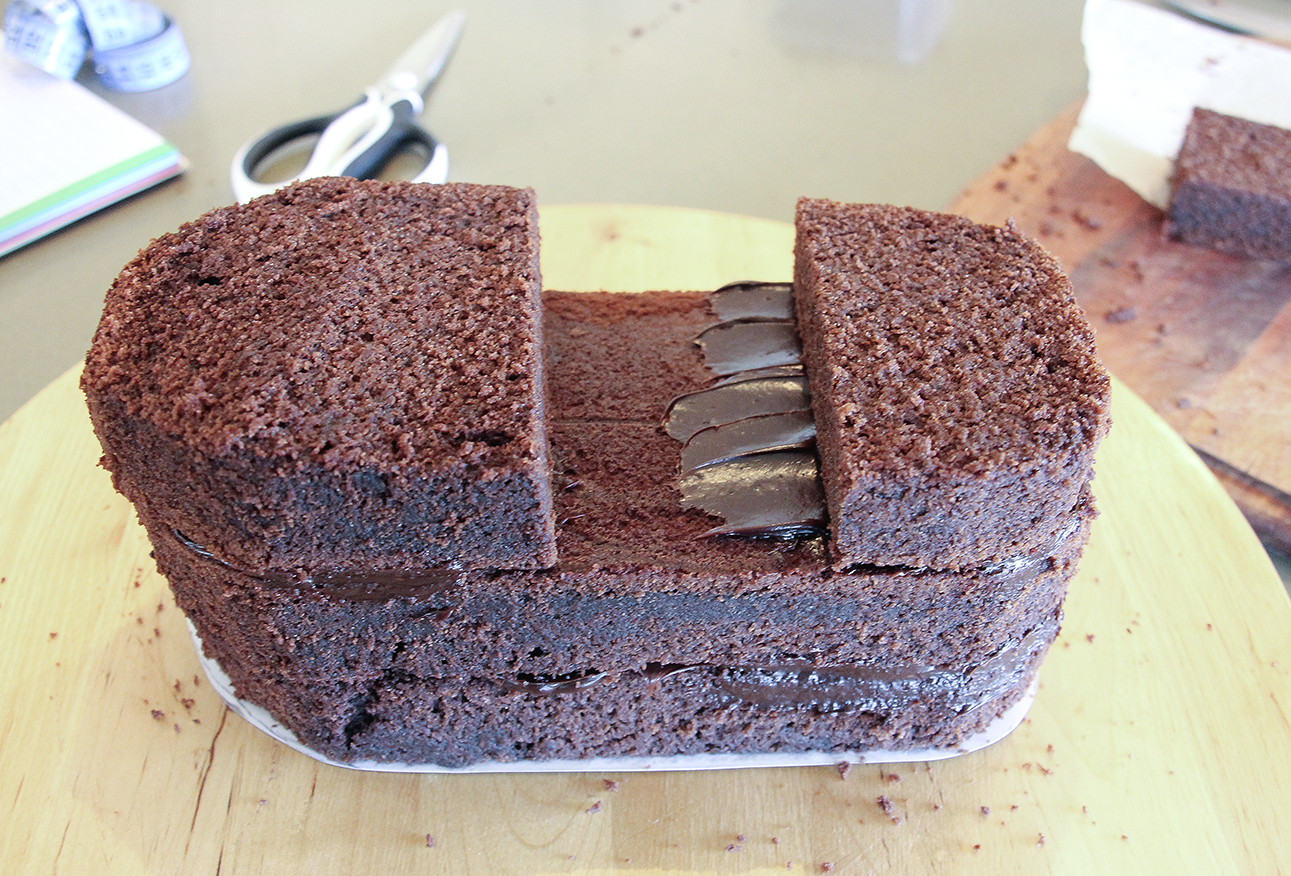
Cut dome off top and turn upside down and attach to set up board with some ganache
Now cut in half horizontally and fill with ganache.
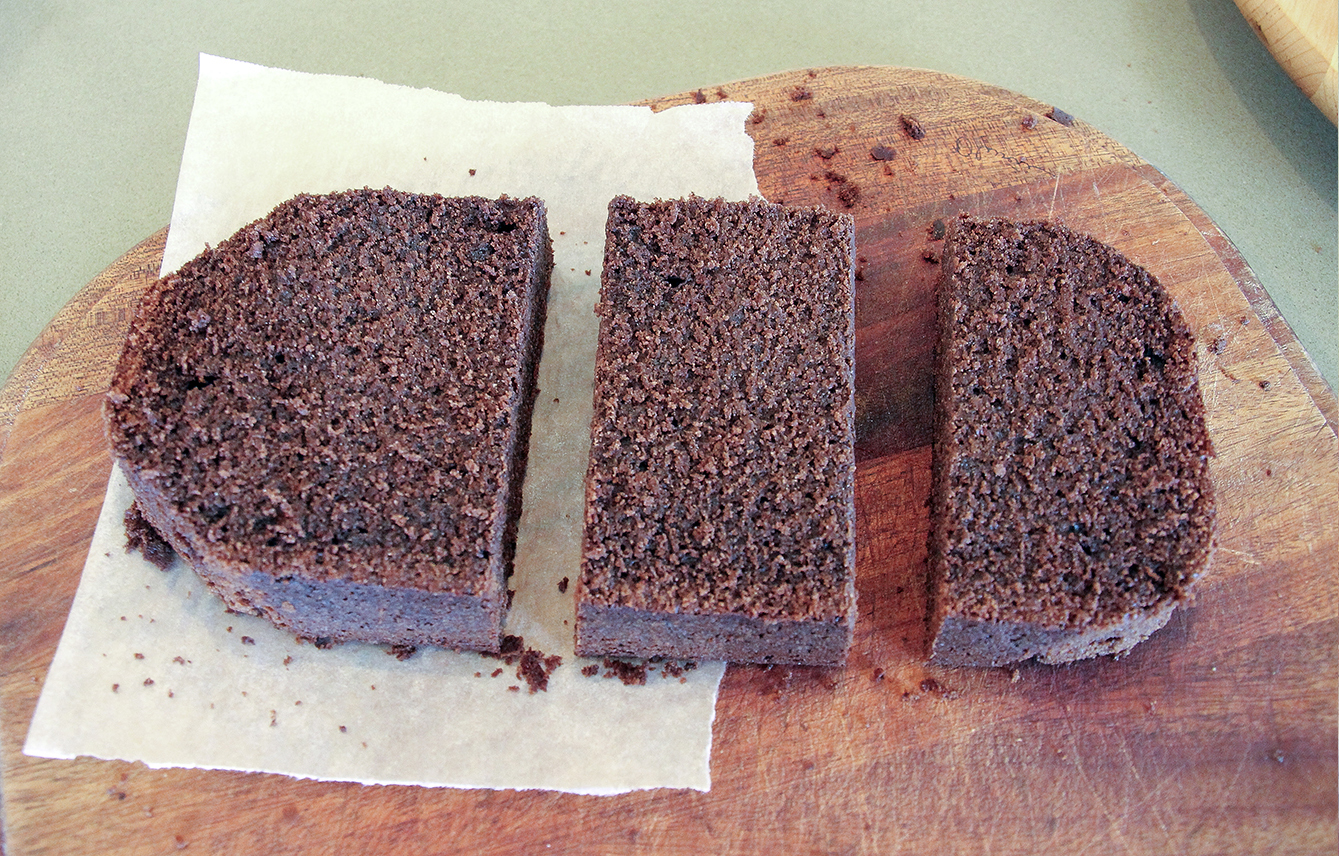
Now take the other half of the cake it horizontally into 2 pieces
Take one piece and cut into 3 sections.
Cut into 3 pieces
Use ganache to attach 2 of these pieces to your ship.
Now take the final piece and cut into 3 pieces.
Use ganache to attach 2 of these pieces to your ship.
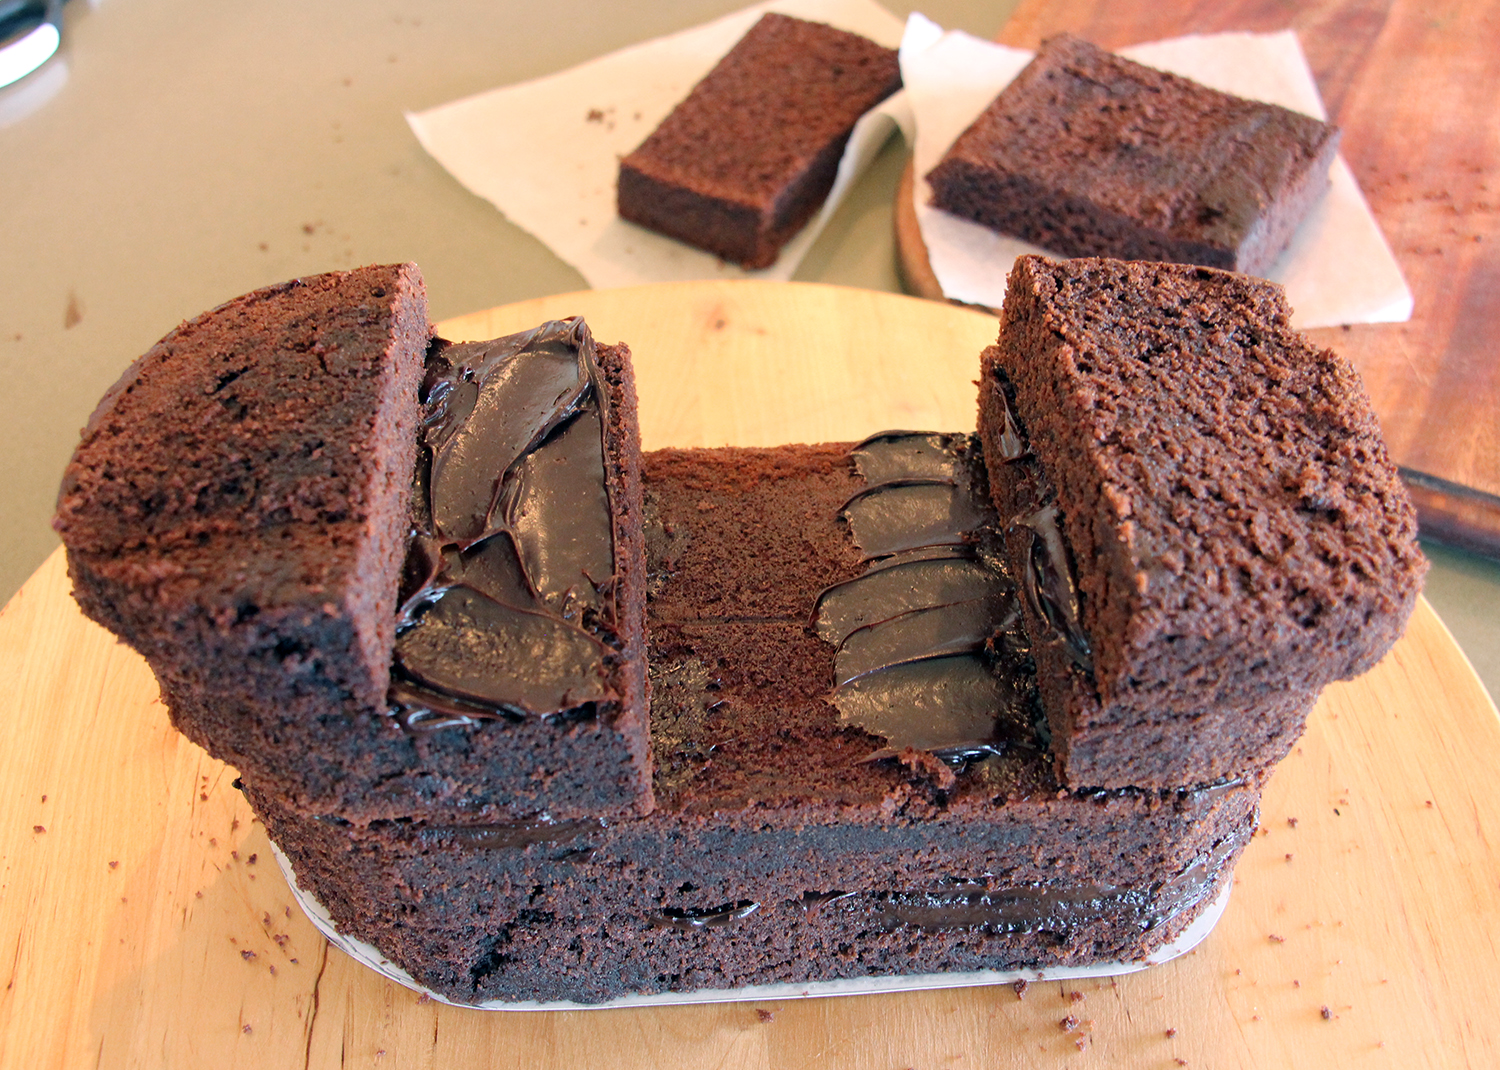
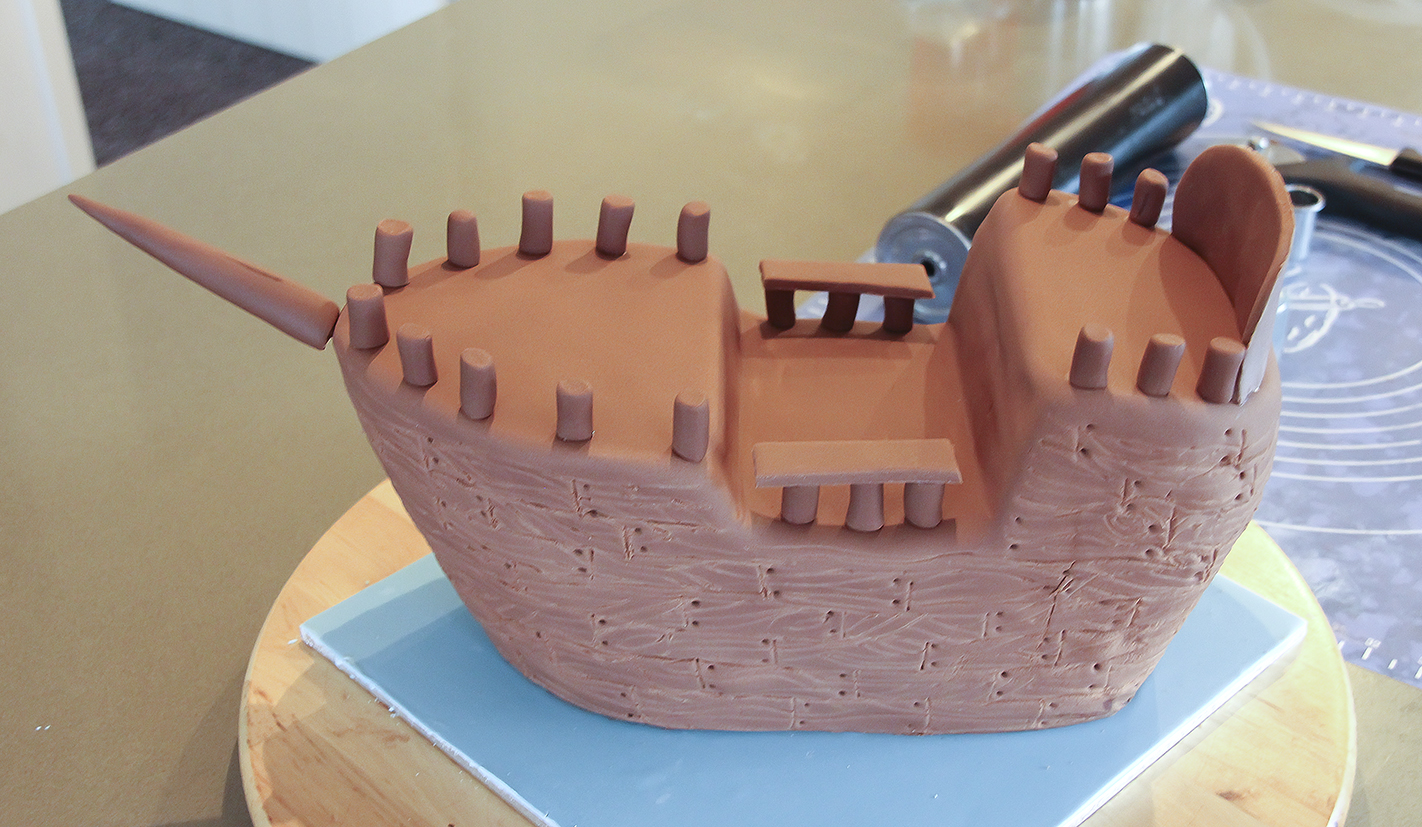
Use up all the leftover pieces of cake to create the Pirate Ship shape that pleases you the best.
Cover with a crumb coat of ganache (a thin layer of ganache to seal in all the crumbs).
Place in the fridge till it firms up.
Add ganache to create final shape, making a nice rounded shape.
Leave on bench to harden (overnight if possible)
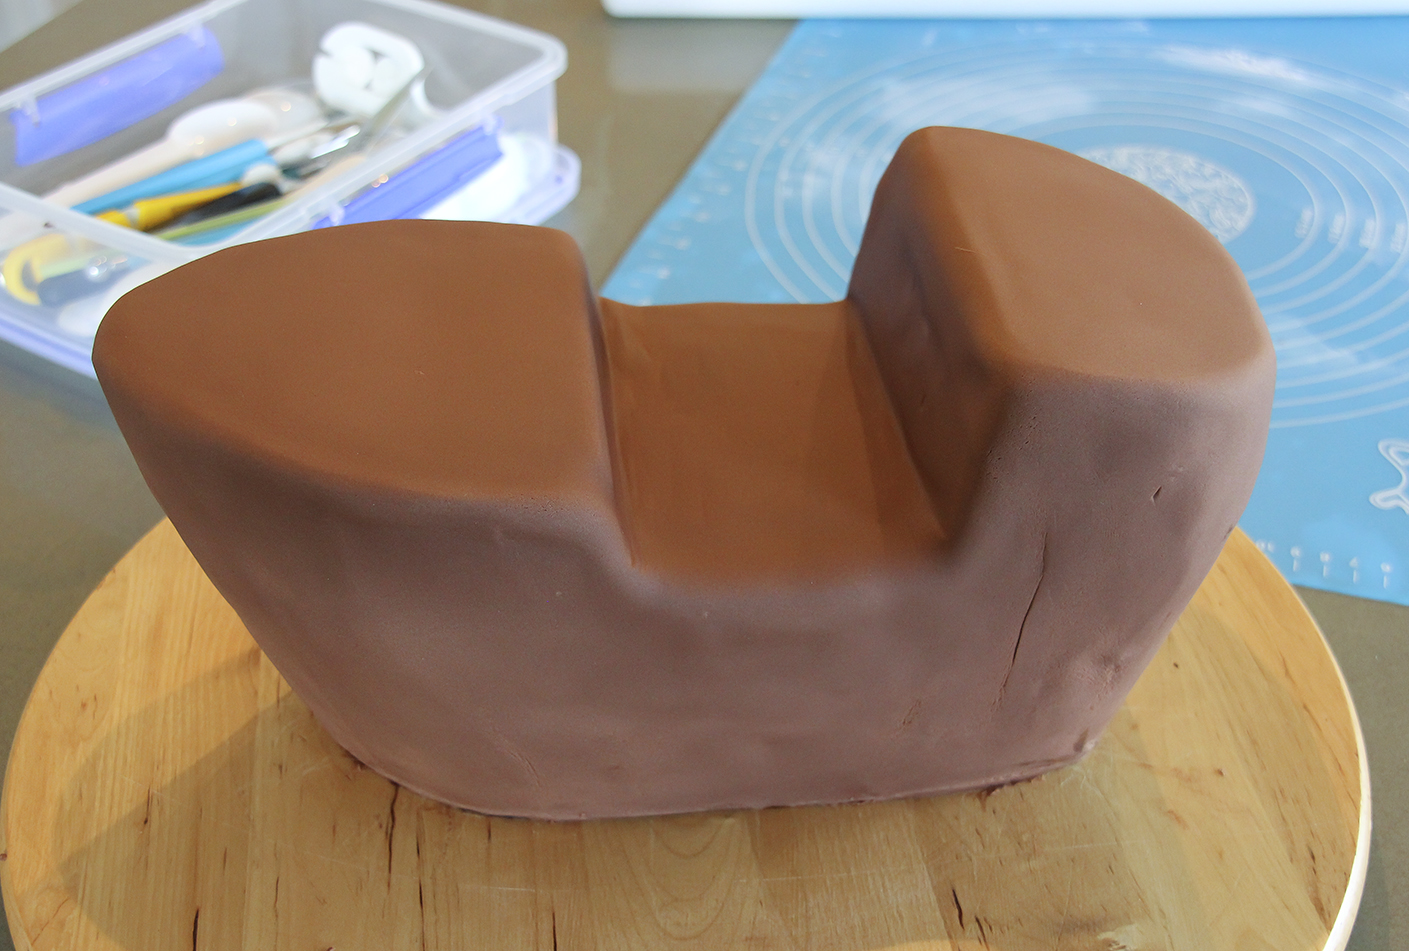
Sugar paste
Paint a thin layer of water onto your cake board and cover with pale blue sugar paste.
Measure the length and sides of your ship so you know the size of the oval piece of brown sugar paste you will need to cover your ship.
Paint a thin layer of water over the entire ship and cover with the one large piece of sugar paste.
Use smoothers to smooth your sugar paste.
Decoration
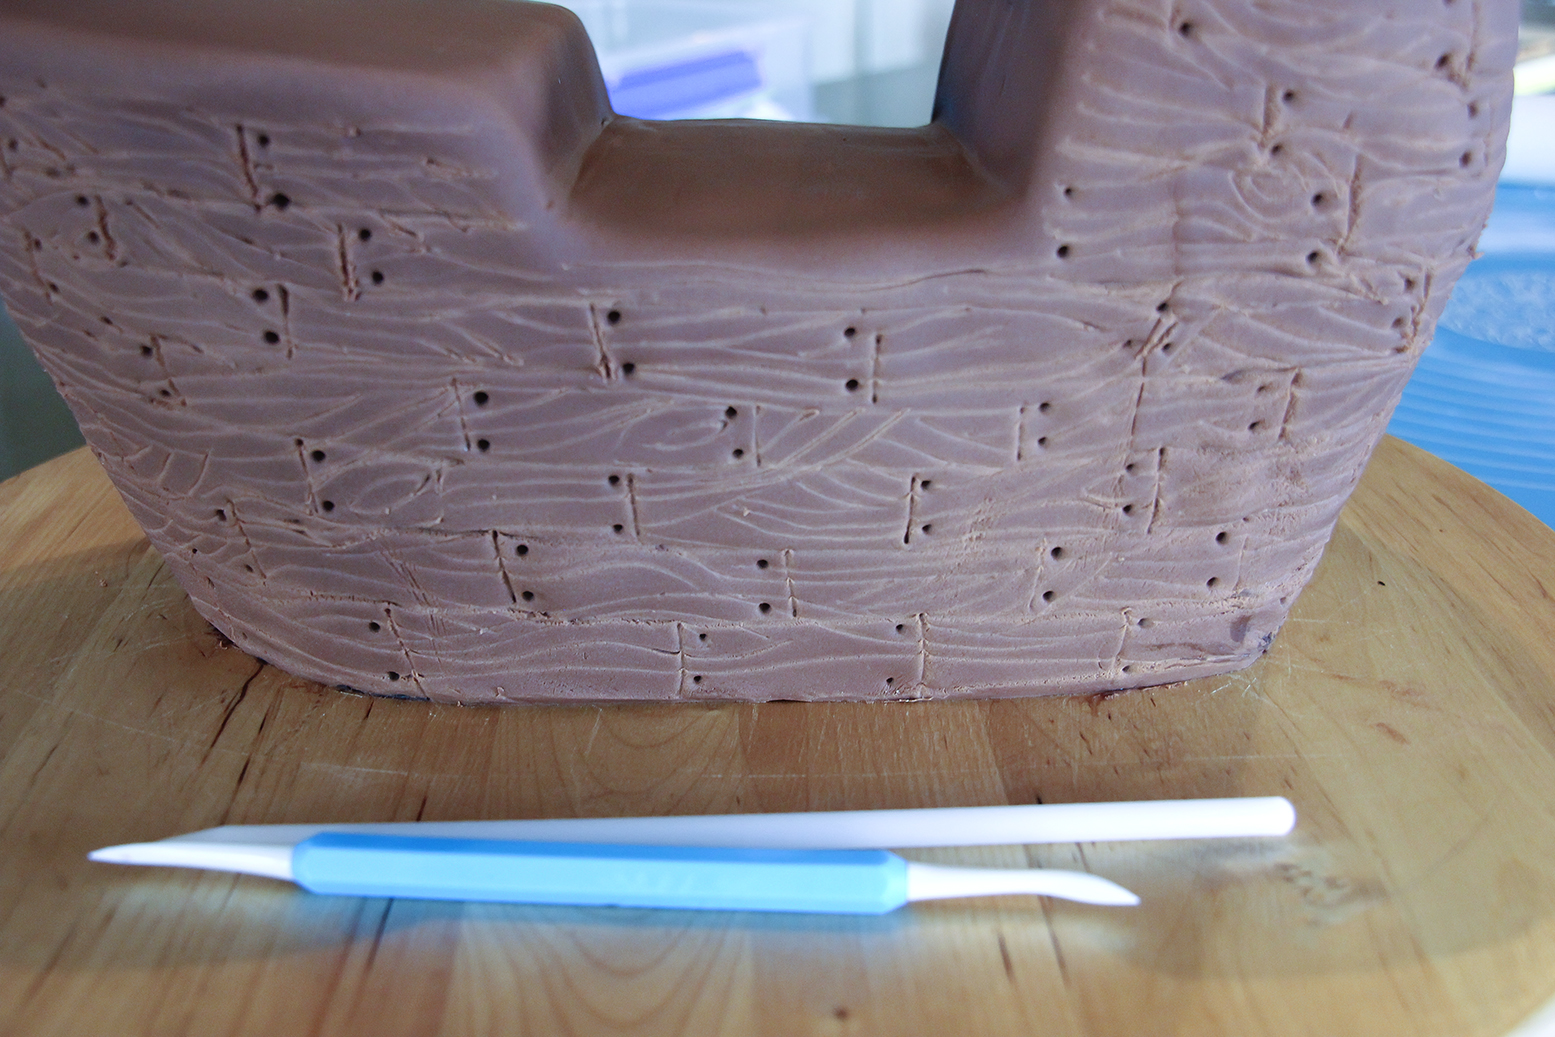
Make marks on side of ship to resemble old wooden planks.
Create an old wooden plank effect
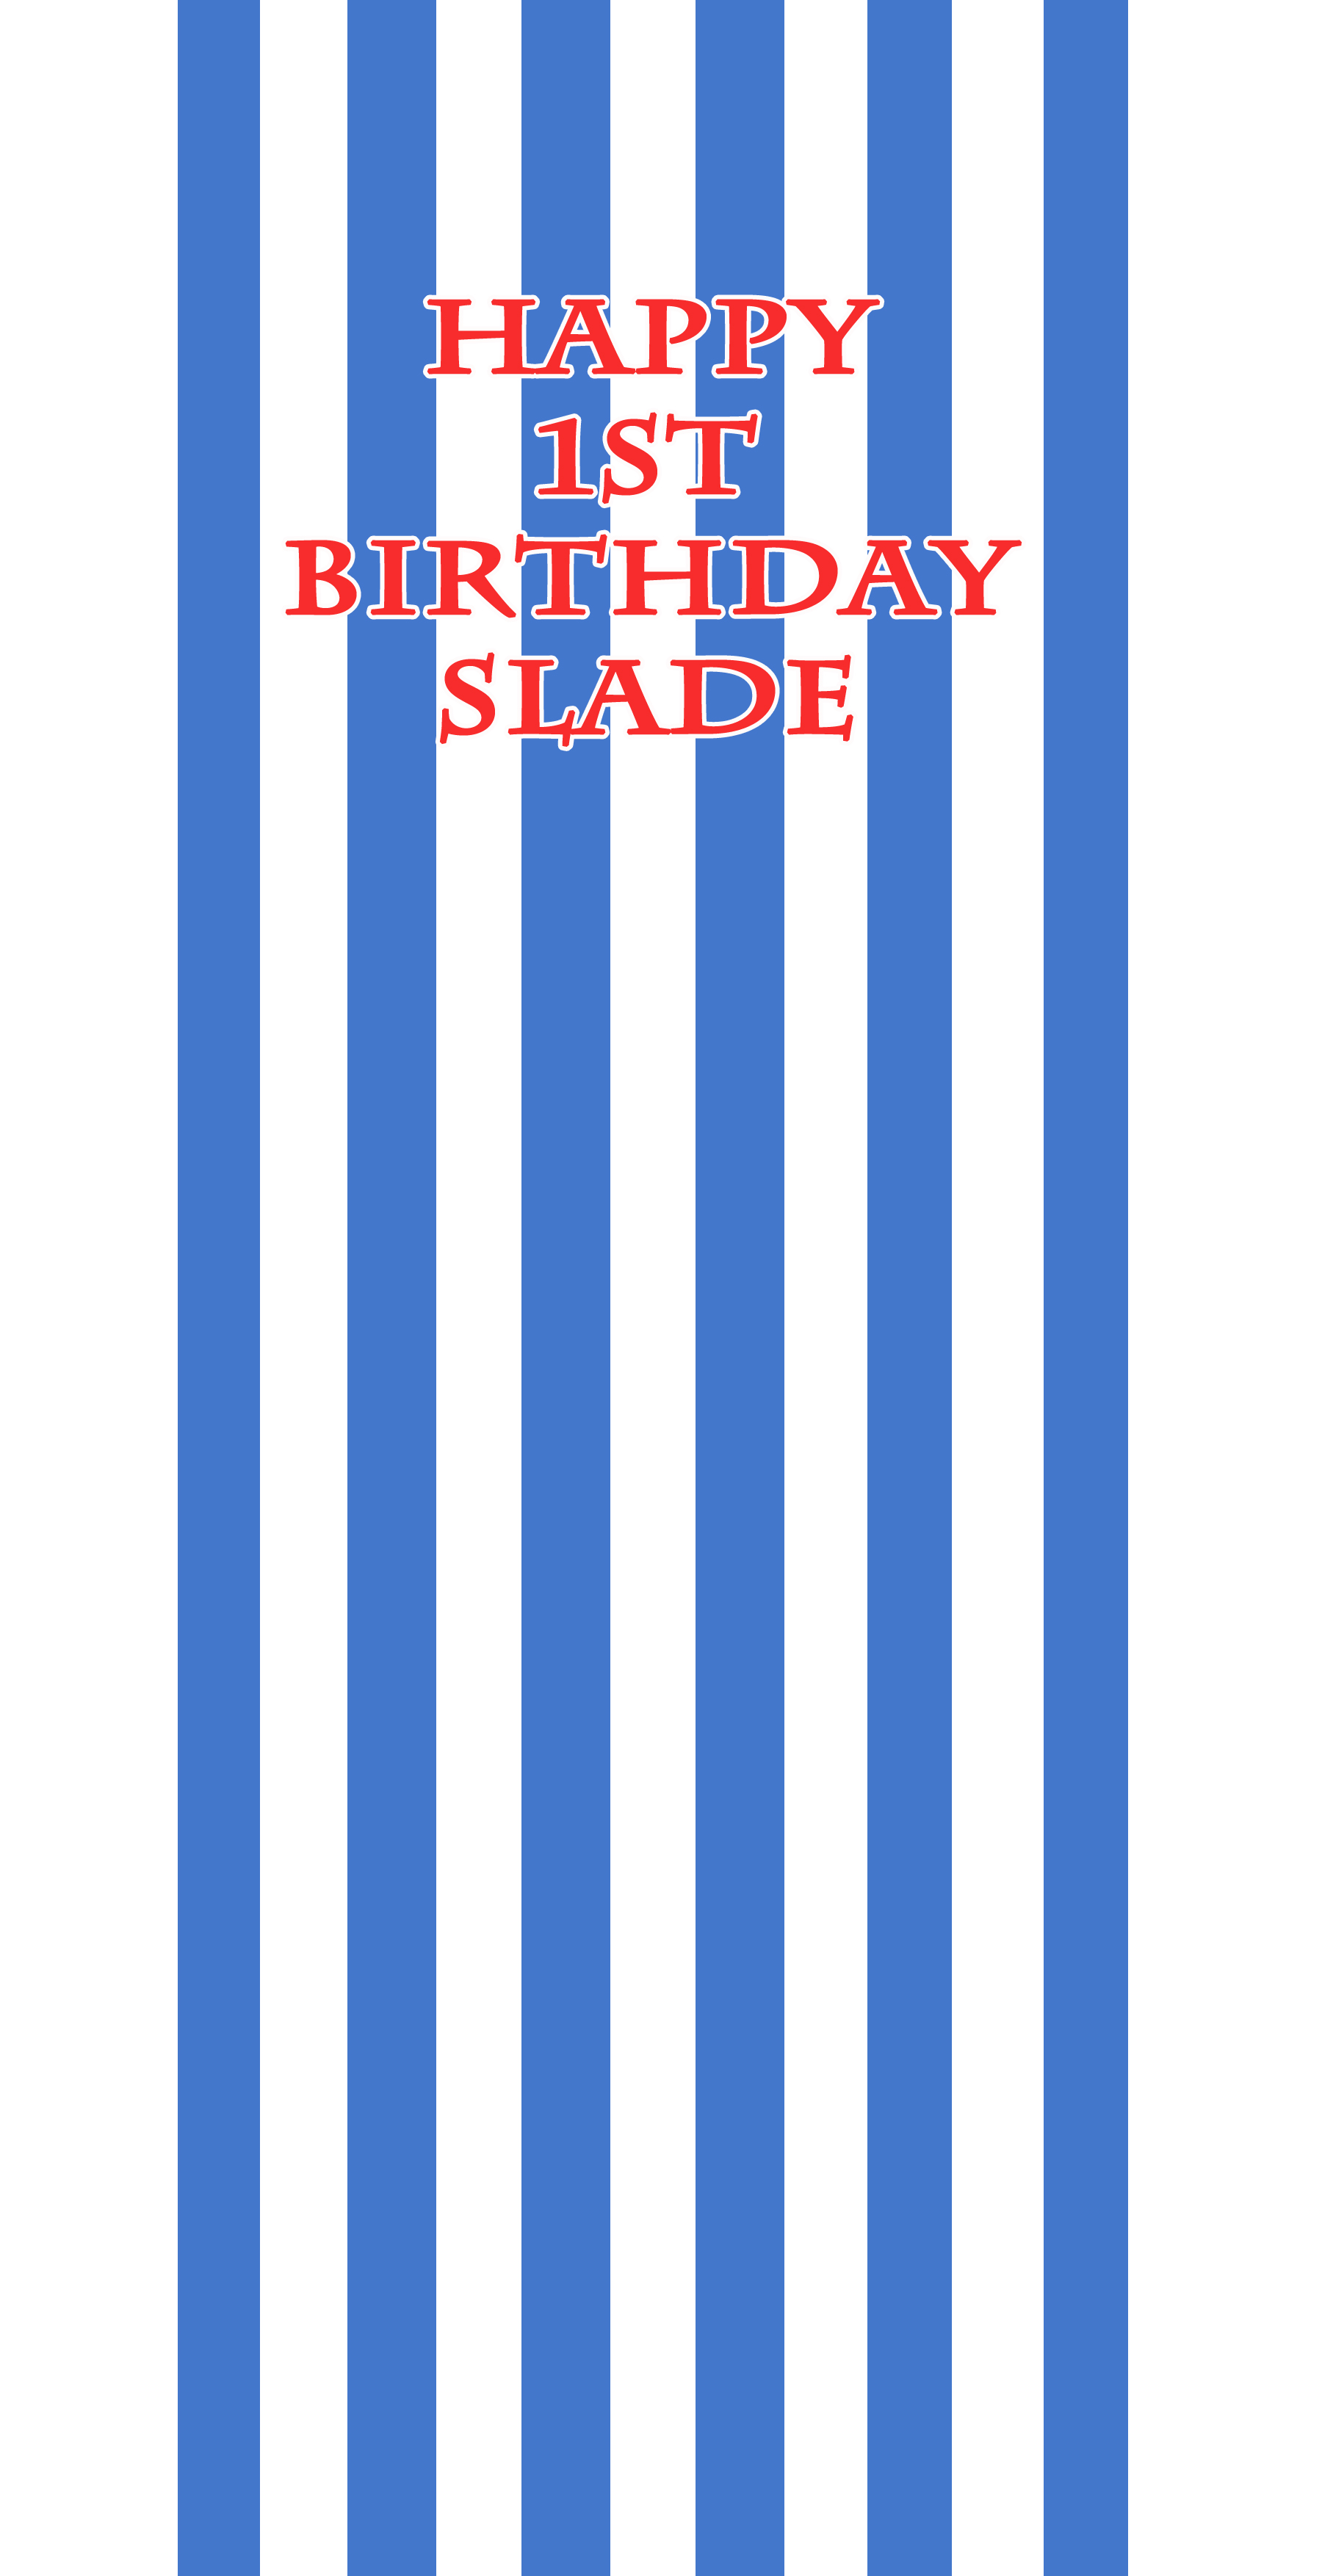
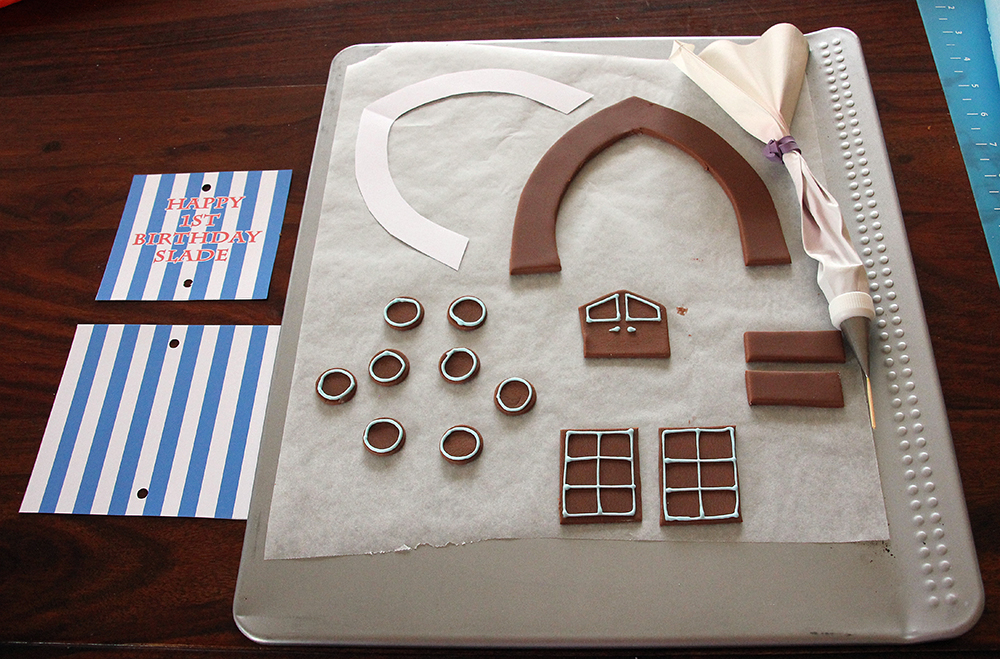
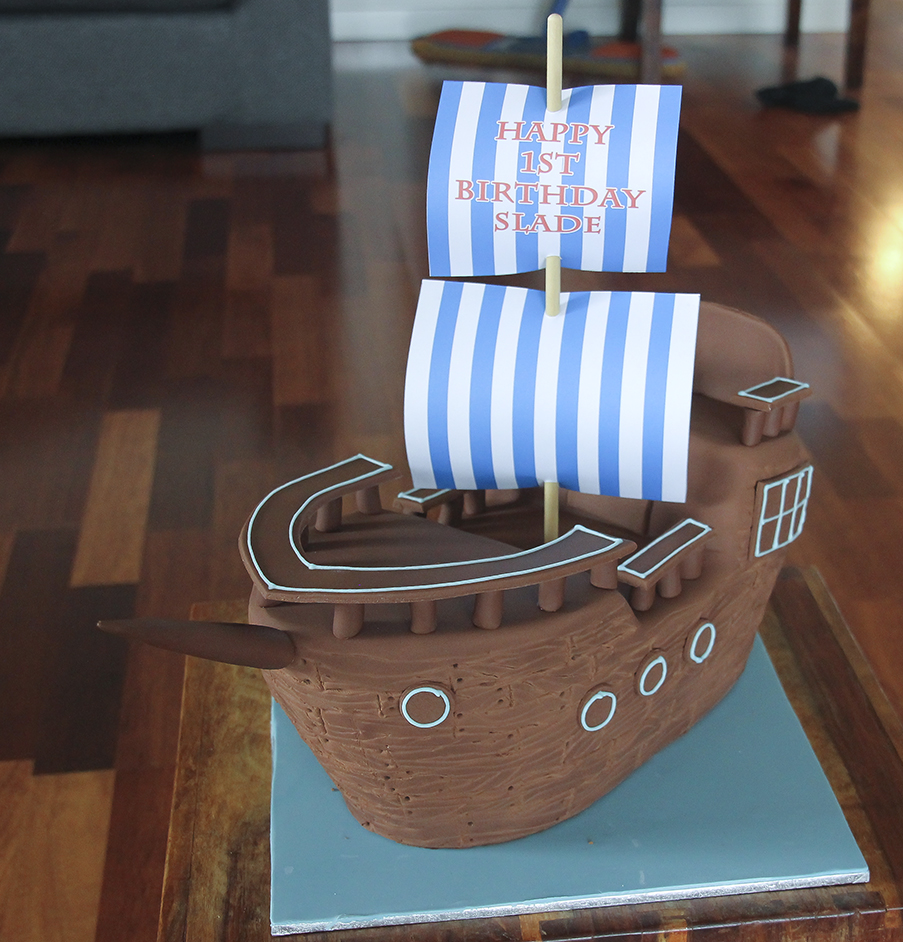
I created some stripes in Photoshop and a birthday message for Slade on lightweight card and cut out a small square with the birthday message as the top sail and a larger square as the bottom square. Use a ‘hole punch’ to make holes for the mast.
Create stripes and a birthday message in Photoshop
Roll out some of the left over brown sugar paste into a long thin sausage shape and cut 22 pillars of equal length. use fingers to make each one as cylindrical as possible and stick to ship with a little water, edible glue or egg white.
Add some tiny pillars around the decks
Cut out some port holes, windows, doors and handrails. Use a piping bag to pipe some pale blue Royal Icing around the windows etc. to add interest. Leave overnight to firm up.
Windows, port holes and handrails.
Stick all the remaining bits and bobs to the ship and set sail for the open seas.
This cake does not require any sugar paste which is excellent news for children who dislike sugar paste or the decorator who dislikes using sugar paste. The Chocolate ganache finish is a little rustic but suits our cheeky little Jawa well. There are no real instructions for sculpting this cake as I mostly used my fingers and a small pallette knife. The chocolate ganache behaves a bit like clay and when it gets a bit soft you just pop it in the fridge to firm up again. Ingredients for Chocolate Mud Cake I used 3 round cake pans 5″, 5.5″ and a 6″. The eyes are two yellow sweets (lollies) with a sugar coating.
435g butter
350g dark chocolate
2 tblsp instant coffee powder
2.5 cups warm water
330g caster sugar
360g SR flour
60g cocoa powder
4 eggs
2tsp vanilla
method:
Grease and line base and sides of the bowls with one thickness of baking paper, bringing paper 5cm above side of pan.
Combine chopped butter, chopped chocolate, coffee, and water in a saucepan. Stir over low heat until chocolate is melted. Cool 15 minutes. Transfer mixture to bowl of large mixer.
Add caster sugar to mixture and beat well until dissolved. Add sifted flour and cocoa, lightly beaten eggs and vanilla.
Pour mixture into prepared bowls.
Bake at 150C for 1 hours. Test with skewer. Cool cakes in their pans.
Ingredients for the Ganache to fill and cover Jawa’s head and body (for more information on making and using ganache click here)
1 x 600ml pure cream
1,900g dark chocolate
method:
Place pieces of chocolate in food processor and process till chocolate looks like coffee granules.
Put the cream in a saucepan and bring to boiling point. Pour the cream over the chocolate and mix with a hand whisk until the ganache is smooth. (Do not use an electric whisk, as you will create too many air bubbles in the ganache.)
Allow to cool completely and then leave to set overnight.
Ready for the oven
Proccess the chocolate to the size of coffee granulesGanache nice and smoothBaked, cooled and ready for the ganache
To assemble the cake
(Sorry that I have no pictures for this part, I must have been so caught up in my work that I forgot to use my camera!) I cut all 3 cakes through the middle and filled them with ganache. I started with the smallest cake and shaped it roughly into a head shape, covered it in ganache roughly and put it in the fridge to harden a bit. Then I stacked the two largest cakes one on top of the other with the largest at the bottom. I inserted a wooden dowel down through the middle of the cake with a portion left sticking up through with a point on the end so that I could slide the head on. I used ganache to help stick the head to the body. I used the pieces of cut off cake ( I mixed the cake with some ganache to make it easy to mould) to help mould the Jawa shape e.g. his knee and foot but not his arms at this stage. Place in the fridge to firm up again. Cover all exposed areas of cake with a thin layer of ganache (crumb coat) Place in fridge to firm up.
I used this image as inspiration for my cake.
To build up the arms I used a few cocktail sticks and layered the ganache slowly adding to the size and shape while still popping the cake in the fridge to firm up each stage before continuing. I had a few saggy moments but that only made me more careful and determined to make it work. I made the gun in the same way and added it at the very end with the help of 2 toothpicks. I enjoyed mouling the shape with my hands and although it looks like s..t to begin with it soon starts to take shape and creating the hood and sleeves is just magic!
Making the top and bottom parts of the gunJawa gun
I added some raw caster sugar at the base to look like sand.
From all angles
Some more of my Star Wars Cake Tutorials
Click on the images below to go straight to the corresponding tutorial.
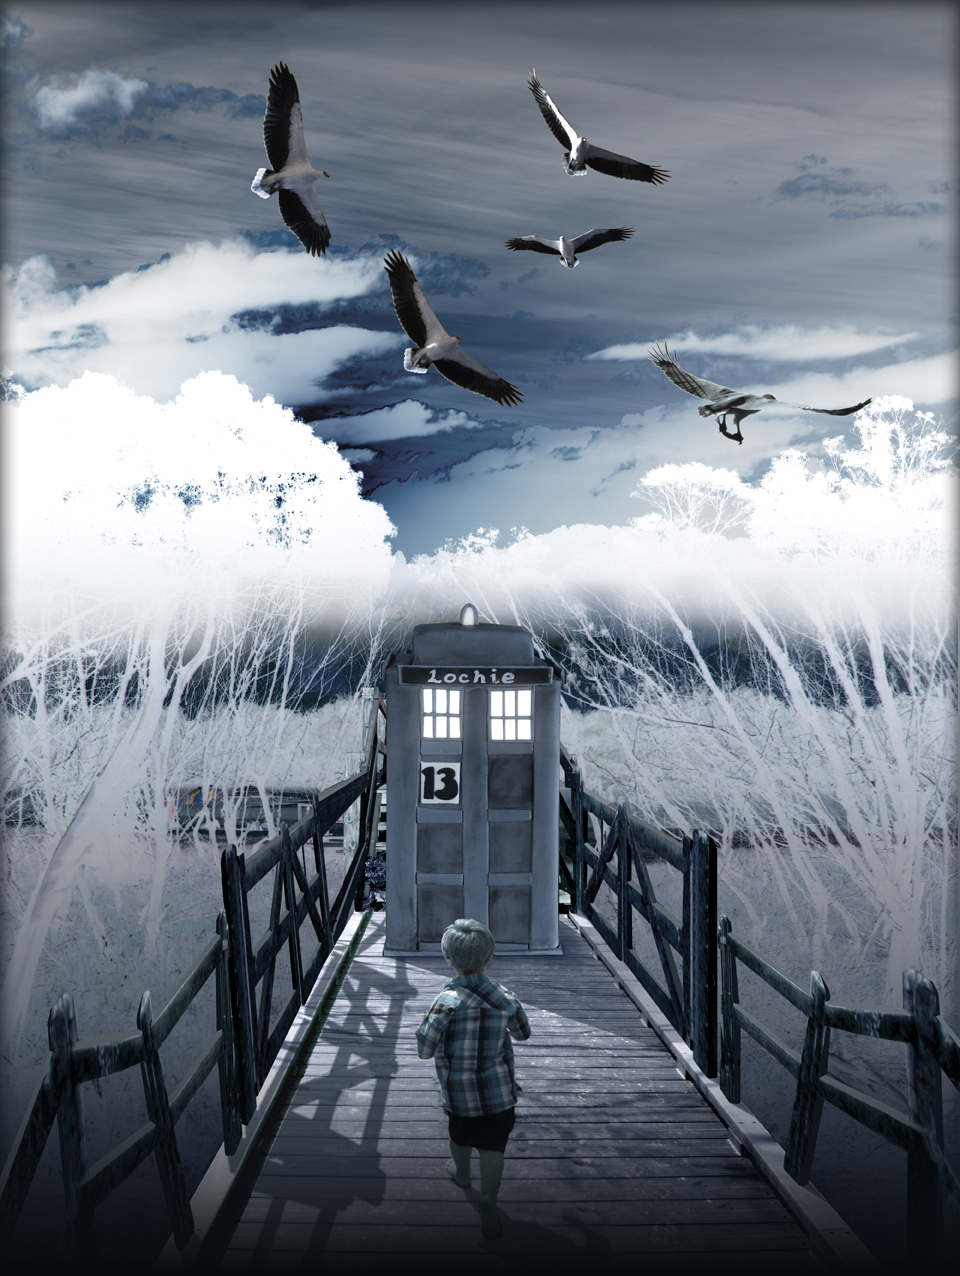
A Tardis cake for Lochie on his 13th birthday. He is a big Dr Who fan!
The Tardis cake was on a black marble turntable and we hid it in the media room (no windows). Lochie was brought into the darkened room and someone swirled the cake around at speed while another person moved their hand rapidly up and down in front of a torch, creating a strobe effect while a third person (Alasdair) played the Dr Who TV theme tune on the laptop. All of this went down really well!
This cake was another of my dark chocolate mud cakes with dark chocolate ganache filling as all children seem to love it and adults too. The cake is quite straightforward and the instructions are easy to follow. It did, however, take longer to make than I anticipated so leave some extra time for the finishing touches.
Materials
8″ square cake tin
2 x 4.5″ set up boards
2 x 4″ set up boards. These boards will be used to separate the top and bottom parts of the cake.
1.5 kg blue / grey sugar paste
Small amounts of black and white sugar paste for windows, signs etc.
Dark blue petal dust
I used an 8″ square pan for the cake but I used the recipe for a 9″ square cake so that my cake would be taller than normal.
Tardis in action!
9” square dark chocolate mud cake recipe
400g unsalted butter
325g dark chocolate
1.5 tablespoon instant coffee
2.2 cups warm water
2.5 cups self raising flour
1.5 cup caster sugar
0.4 cup cocoa
3.25 eggs
1.5 teaspoon vanilla
Instructions:
1. Grease and line base and sides of cake pan with one thickness of baking paper, bringing paper 5cm above side of pan.
2. Combine chopped butter, chopped chocolate, coffee, and water in a saucepan.
Stir over low heat until chocolate is melted. Cool 15 minutes. Transfer mixture to bowl of mixer.
3. Add caster sugar to mixture and beat well until dissolved. Add sifted flour and cocoa, lightly beaten eggs and vanilla.
4. Pour mixture into prepared pan.
5. Bake at 150C for 1 to 1-1/2 hours. Test with skewer. Cool cake in pan.
Dark Chocolate Ganache
1.2 kg (2 lb 10 oz) dark chocolate, finely chopped
600 ml (21 fl oz) pure cream
Instructions
1. Put chocolate pieces in a large bowl
2. Put the cream in a saucepan and bring to the boil. Pour the cream over the chopped chocolate and mix with a whisk until the ganache is smooth. Do not use an electric whisk as you will create too many air bubbles in the ganache.
3. Allow to cool completely and then leave to set overnight.
For detailed instructions on how to make ganache and cover your cake with it click here
Creating the Tardis shape
1. Cut your cake into 4 small cakes, each 4″ x 4″.
2. Now cut each of these horizontally, giving you 8 pieces.
3. Make two cakes. The bottom cake will require 4 pieces filled with ganache sitting on the 4.5″ set up board. Also cover the top and sides with a thin crumb coat of ganache.
4. The top half is made up of 3 pieces sitting on the smaller 4″ set up board. Fill with ganache and again cover with a thin crumb coat of ganache.
5. Place the remaining 4″ board upside down on top of your bottom cake then place the top cake on top of this. Where the two cakes meet can eventually be separated when you cone to cut the cake. This will make it easy to cut elegant slices of cake.
6. Wait until your ganached cake firms up. You may need to put it in the fridge for half an hour.
6. You should now have one remaining 4.5″ board. Place it on top of the cake and use it as a guide to help you ganache the sides of the cake. If you use a set square you can run it along the sides of the cake using the 4.5″ boards at the top and bottom as a guide. Easy!
Ganached
The final cake slice will be used as the roof so cut the sides off to make it a little smaller and cover it with ganache. You can cover it with blue/grey sugar paste as soon as the ganache forms up.
Roof ganached
To cover in sugar paste, use a brush to apply a thin layer of water onto the ganache. Make a lid and attach. Measure the the height of the Tardis and the perimeter. Cut out the sugar paste a little larger and wrap around. Trim off the excess. The rough join is unimportant as corner pieces will eventually cover it.
Covered in sugar pasteAttach the roof with a thin layer of water.Add 4 thin pieces of sugar paste to neaten up the roof.Much better!Cutting out the corners using the width of the ruler as the width of the sugar paste.Cutting slimmer strips to attach to the centre of each side.Paint on a little water to help each piece stick.Adding more detailCutting out the windows. I used the width of my ruler as a guide but had to cut a little more off each to make a snug fit.The REAL Tardis doorRoll out thin lines of sugar paste to make the small windows
Use a dry paint brush to apply the dark blue petal dust to your cake. Use it to darken the shadows and to make the overall look distressed.
Tardis completeTardis, view from aboveI used photoshop to place the Tardis cake on an image that I created a while back called ‘Where the Wild Things Are’. Details belowThis photomanipulation is made up of several images. I took a picture of Callum on the boardwalk leading to the creek at Pottsville. I inverted the trees either side and added the steps from a picture taken at Norries Head, Cabarita. The fence is from a friend’s garden in Springbrook National Park. All the shadows on the boardwalk are just painted on in Photoshop and the birds are several shots of the one bird, a White-bellied Sea-Eagle, taken at Murwillumbah, flying overhead on the banks of the Tweed River near Dallis Park.Tardis
Balin and his Angry Birds birthday cake (picture taken by my good friend Jillian Merlot, Balin’s gran) I had to do a little post processing in Photoshop of course!
Make the 8″ square Dark Chocolate Mud Cake
500g unsalted butter
400g dark chocolate
10g (2 tablespoon) instant coffee
2-2/3 cups warm water
380g (2 cup) caster sugar
520g (3 cups) self raising flour
60g (1/2 cup) cocoa
4 eggs
2 teaspoon vanilla
1. Grease and line base and sides of cake pan with one thickness of baking paper, bringing paper 5cm above side of pan.
2. Combine chopped butter, chopped chocolate, coffee, and water in a saucepan.
Stir over low heat until chocolate is melted. Cool 15 minutes. Transfer mixture to bowl of mixer.
3. Add caster sugar to mixture and beat well until dissolved. Add sifted flour and cocoa, lightly beaten eggs and vanilla.
4. Pour mixture into prepared pan.
5. Bake at 150C for 1 hour 45 mins. Test with skewer. Cool cake in pan.
Make the Dark Chocolate Ganache
1.2 kg (2lb 10oz) dark chocolate, finely chopped
500ml (17.5 fl oz) pure cream
Method: Heat the cream until it just starts to bubble, pour over chocolate (which you have blitzed in the food processor to coffee granules size) and let it sit for about a minute to melt. Use a hand whisk to blend it all together then set aside to cool.
Your ganache at this point will be thin. You will have to let it set overnight until it thickens to a slightly thicker peanut butter consistency. Since I don’t have the patience to wait, I just let it cool to room temperature and then pop it in the fridge (don’t cover because you might get condensation). It would usually set in the fridge in about an hour or two. If it sets too hard, just microwave it in 10 second intervals (keep mixing it whenever you take it out).
For more information on how to make ganache and cover your cake with it, please click here.
Inspiration 2
inspiration 1
actual game
I used the three images above as my inspiration. I tried to match the sizes, shapes and colours as I put together the birds, pigs and timbers. I also went online and played the game just to better understand the whole ‘Angry Birds’ thing.
Catapult
I made all the pieces separately as they were being transported to the birthday party and with the cake being tall and slim (reflecting the 2D nature of the Angry Birds game) I was afraid that the cake would be top heavy and topple over in the car. I used cocktail sticks and wooden skewers to keep everything straight and the spikes came in handy for anchoring the timbers to the cake later on.
Timbers 1Timbers 2
I made an 8″square dark chocolate mud cake and cut it in half and filled it with dark chocolate ganache. I then cut the cake up to resemble the online game silhouette finally covered the top and sides with the remaining ganache.
Angry Birds cake under constructionAngry Birds cake
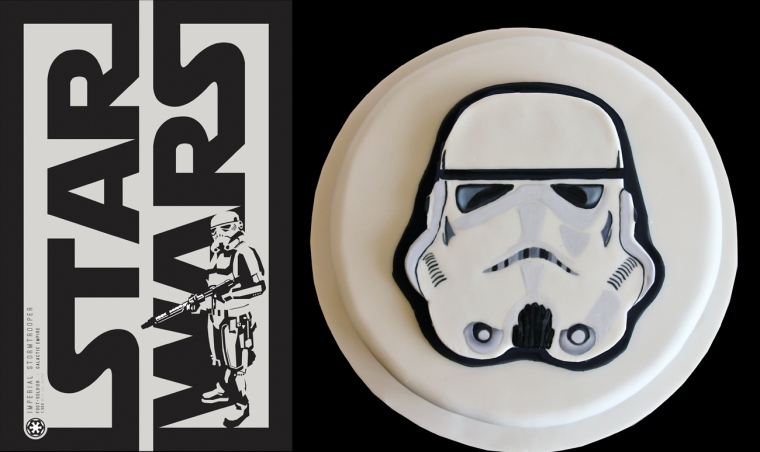
Now that you have mastered the Angry Bird cake you have to have a go at the Star Wars Angry Bird Cake that I made in September 2014!
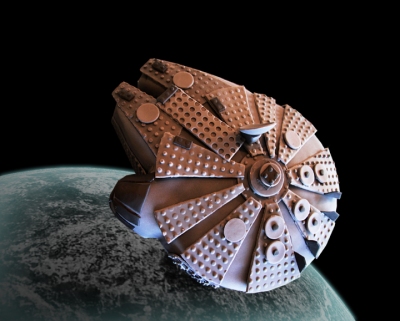
Nothing evokes nostalgia quite like Lego and Star Wars! Embrace that feeling by following the steps in this tutorial to create a dark chocolate Lego-style Millennium Falcon!
This cake is built around an 8″ round dark chocolate mud cake but you will also need a 6″ round dark chocolate mud cake to make the Cockpit and Forward Mandibles not to mention the Concussion – Missile Tubes!!!!!! I have given instructions on how to make a 10″ round cake and this will produce enough batter to fill the 6″ and 8″ pans.
Materials
white card
Mud cake
375g unsalted butter
300g dark chocolate
1.5 tablespoon instant coffee
2 cups warm water
1.5 cup caster sugar
2.25 cups self raising flour
3/8 cup cocoa
3 eggs
1.5 teaspoon vanilla
Ganache
1200g dark chocolate
600ml pure cream
2kg grey sugar-paste
a small amount of black sugar-paste
1. Making the set up board
Print out this picture of the Millennium Falcon onto an A4 sheet of paper so that the image fills the page and this will give you the actual size of your finished ship (i.e. 8″ diameter of the large round part of the ship) . You will need two prints as you will be cutting one of them up.
Cut out the shape of the ship in white card or add the extra bits to an 8″ round board as I have done in the picture. This set up board (as it is called) will help you to cut out your pieces of cake and also help when applying the ganache to the sides of your cake. More of that later.
2. Covering the cake board
Use the underside of a Lego base board to give you the brick impression.
Press down firmly and evenly to get the best results
Although some bits of my cake board are a little flat, the ship will cover them.
3. Making the Lego shapes
Use the plan view of the Millennium Falcon to plan and cut out the shapes that you need.
I decided on making mostly triangular shapes and as I cut each one out I placed it on top of the plan view to see how they would all fit together. Once each shape had been cut out, press the Lego board on top to make it look like Lego bricks then neaten up the edges if they have spread a little due to the pressure.
To make the satellite dish, cut out a circle of grey sugar-paste and leave it to harden on the back of a tablespoon to give it a beautiful spherical look. Attach a thick triangle of sugar-paste to its base with edible glue or egg white.
4. Bake the cake
1. Grease and line base and sides of cake pans with one thickness of baking paper, bringing paper 5cm above side of pan.
2. Combine chopped butter, chopped chocolate, coffee, and water in a saucepan.
Stir over low heat until chocolate is melted. Cool 15 minutes. Transfer mixture to bowl of mixer.
3. Add caster sugar to mixture and beat well until dissolved. Add sifted flour and cocoa, lightly beaten eggs and vanilla.
4. Pour mixture into prepared pans. Use a skewer to check that both pans have the same depth of batter. This will ensure that both cakes end up the same height.
5. Bake at 150C for 1 to 1-1/2 hours. Test with skewer. Cool cake in pan.
5. Making the ganache
Heat the cream until it just starts to bubble, pour over chocolate (which you have blitzed in the food processor to coffee granules size) and let it sit for about a minute to melt. Use a hand whisk to blend it all together then set aside to cool.
Your ganache at this point will be thin. You will have to let it set overnight until it thickens to a slightly thicker peanut butter consistency. Since I don’t have the patience to wait, I just let it cool to room temperature and then pop it in the fridge (don’t cover because you might get condensation). It would usually set in the fridge in about an hour or two. If it sets too hard, just microwave it in 10 second intervals (keep mixing it whenever you take it out). Click here to find out all you need to know about making and applying ganache to your cake.
6. Putting the cake together
Use the smaller cake to cut out the cockpit and Mandibles. Lay the templates on top of the cake and cut around them with a sharp knife. Now cut all your pieces in half ready for the ganache filling.
Use a non-slip mat under your set-up board then stick your pieces to the board with some ganache.
Use ganache to stick all the pieces to each other.
Now add a nice thick layer of ganache across the top as the filling for your cake.
Place the top half of the cake on top of the ganache remembering to stick the pieces together with ganache.
Cover the top and sides of the cake with remaining ganache.
7. Icing the cake
Roll out a large oval of grey sugar-paste making sure it is large enough to cover the cake plus a few centimetres more.
Getting the sugar-paste neatly in and around the Millennium Falcon shape is probably the most difficult part of making this cake. It might be simpler to make the cockpit and mandibles serarately and attach them to the body of the cake after you apply the sugar-paste. Anyway, it doesn’t have to be mega neat as most of the ship will be covered in Lego shapes!
8. Candles
Insert sparkles or candles at the back to resemble thrusters and your done!
More Star Wars Cake Tutorials
Click on the images below to go straight to the corresponding tutorial.
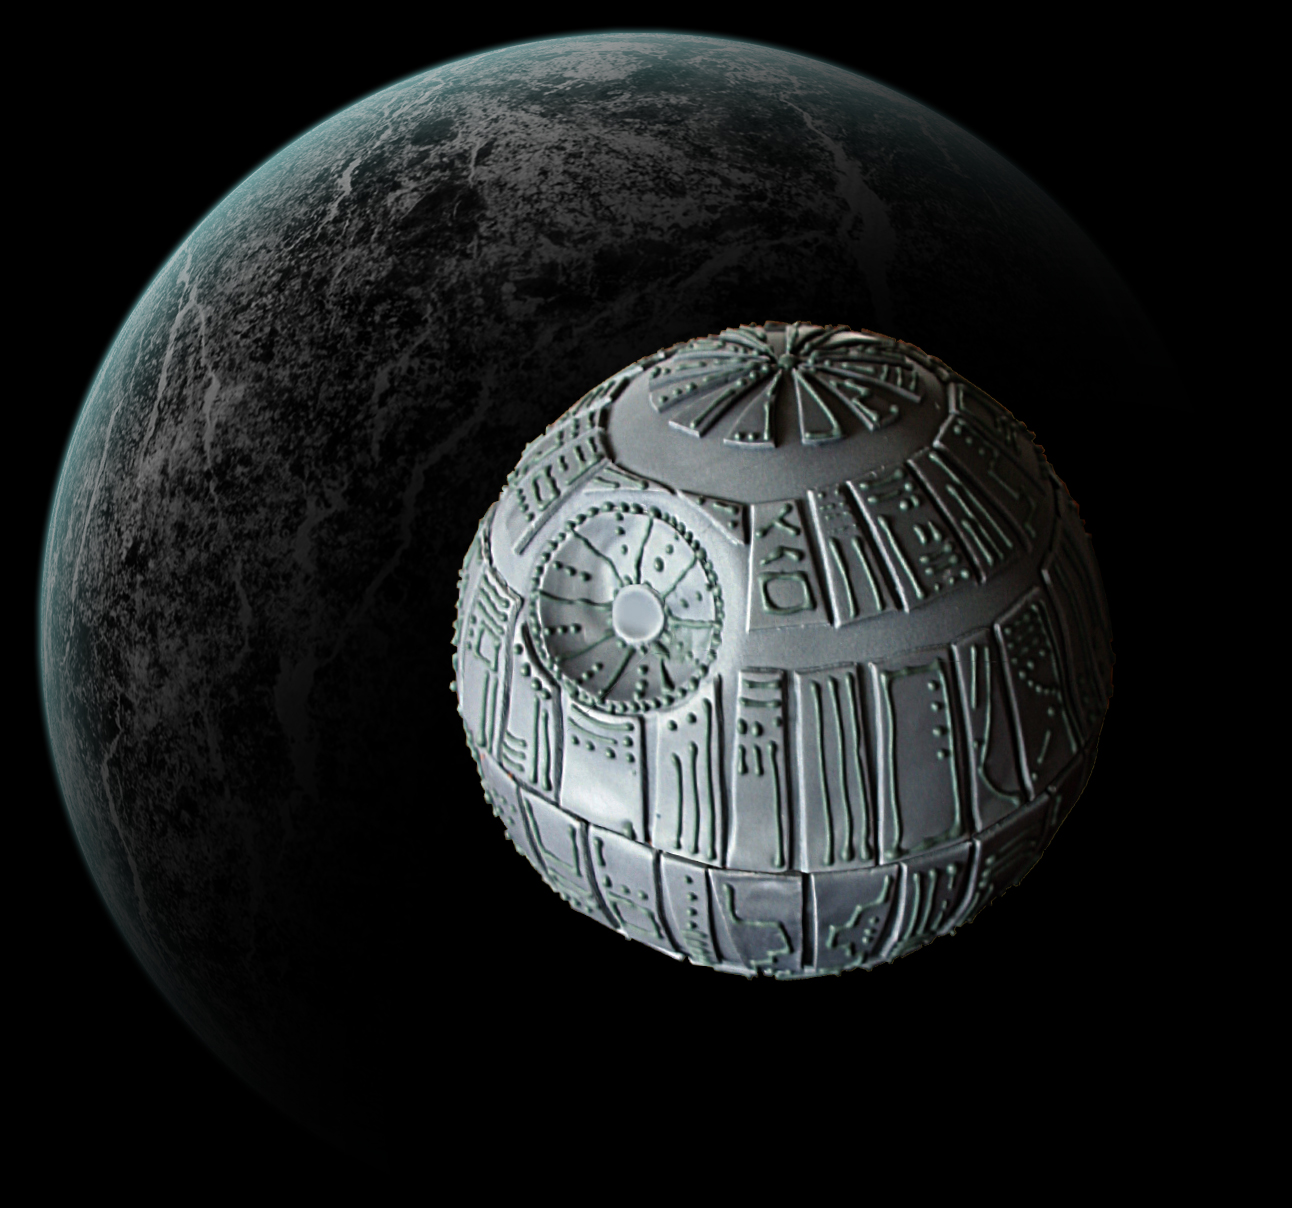
This Death Star Cake was such fun to make that you just won’t know when to stop! It is made of Dark Chocolate Mud Cake and filled and covered in Dark Chocolate Ganache then grey Sugar-paste. Use two 8.5″ or 9″ metal kitchen bowls to bake the cakes.
Dark Chocolate Mud Cake
Ingredients
to fill two 8.5″ metal bowls
500g unsalted butter
500g dark chocolate
2 tablespoon instant coffee
2-2/3 cups warm water
3 cups self raising flour
2 cup caster sugar
1/2 cup cocoa
4 eggs
2 teaspoon vanilla
Instructions:
1. Grease and line base and sides of bowls with one thickness of baking paper, bringing paper 5cm above side of pan.
2. Combine chopped butter, chopped chocolate, coffee, and water in a saucepan.
Stir over low heat until chocolate is melted. Cool 15 minutes. Transfer mixture to bowl of mixer.
3. Add caster sugar to mixture and beat well until dissolved. Add sifted flour and cocoa, lightly beaten eggs and vanilla.
4. Pour mixture into prepared bowls.
5. Bake at 150C for 1 to 1-1/2 hours. Test with skewer. Cool cake in bowls.
Dark Chocolate Ganache
Ingredients
1.2 kg dark chocolate
500ml pure cream
Heat the cream until it just starts to bubble, pour over chocolate (which you have blitzed in the food processor to coffee granules size) and let it sit for about a minute to melt. Use a hand whisk to blend it all together then set aside to cool.
Your ganache at this point will be thin. You will have to let it set overnight until it thickens to a slightly thicker peanut butter consistency. Since I don’t have the patience to wait, I just let it cool to room temperature and then pop it in the fridge (don’t cover because you might get condensation). It would usually set in the fridge in about an hour or two. If it sets too hard, just microwave it in 10 second intervals (keep mixing it whenever you take it out).
If you prefer a really soft filling for your cakes then just whip ½ cup cream and add 2 tbsp of the Ganache and whip a little more. This makes a delicious and easy chocolate mousse.
For more information on ganaching your cake click here.
Sugarpaste
750g in grey to cover Death Star
350g in black to cover board
360g in dark grey for stick on blocks
Royal Icing
to decorate the blocks
250-300g pure icing sugar, sifted
2-4 drops acetic acid (white vinegar)
1 egg white Beat icing sugar, acetic acid and egg white with electric beater on medium-high speed for 4 minutes for ‘soft peak’. Add extra sugar if the icing is too soft.
Achieving the right consistency for Royal Icing can be difficult but practise makes perfect, so if icing is too thick or too thin just empty your piping bag and add more water/vinegar or icing sugar. You will soon work it out. Add black edible colour until the correct shade of grey is achieved. Fill a pipping bag fitted with a number 1 tip.
Step 1. Line tins with greaseproof paper and add a collar of around 20 cms.
Step 2. Bake the cakes and place on 9″ round thin cake boards. Fill and cover in ganache using the instructions above. Make sure that the bottom half of the cake has a flat bottom to sit on.
Step 3. Cover with sugar-paste. If you would like to find out how to colour sugarpaste and use it to cover your cake click here
Step 4. Insert 4 thin plastic dowels as shown and one thick one in the middle which will fit over the small wooden dowel which has been inserted into the base board by first drilling a hole in the middle of the board. These plastic dowels can easily be cut with scissors.
Do not assemble the cakes on the base board until all decoration is fully complete.
The dowel in the centre locates into the hollow dowel in the cake base and helps anchor the cake to the board especially if travelling by car.
Step 5. Roll out the dark grey sugar-paste as thin as you can and cut out all the shapes that you think you will need. Glue them onto the cakes with edible glue (or a little water) and pipe with the Royal Icing making up your designs as you go. Use the pictures of the finished Death Star as a guide only.
Step 6. Roll out the black sugar-paste making a little hole in the centre. Slip the hole over the dowel in the centre and cover the cake board. Lift up the sugar-paste and paint on a little water underneath to help the sugar-paste stick to the board.
Add a little icing or edible glue around the wooden dowel. Slip the bottom half of the Death Star onto the dowel. To attach the top half of the Death Star apply PVA glue to the cake boards or use a knife to spread on some icing. Make sure the concave circle is facing forward and is centralised.
I hope you have as much fun making this cake as I had!
May the Force be with You!
More Star Wars Cake Tutorials
Click on the images below to go straight to the corresponding tutorial.
The label is wet in this photo. it dried out later on.
Step 1 – Make the wine bottle out of gumpaste or fondant at least 3 days ahead:
Use a real wine bottle as a mould and dust with cornflour to keep the fondant from sticking to it…a lot of cornflour. Knead some black fondant with Tylose (helps it dry harder and faster), roll it out to about 1/8″ thick, then lay it over the top half of the wine bottle making sure there is plenty of corn starch between the fondant and bottle. Smooth out the fondant over the bottle and trim off the excess.
I made two bottles just in case one went wrong!!
Tip 1: Be sure to trim it at the half way mark down the side of the bottle so that you can just slip the fondant off the bottle once dry. You can make 2 halves separately then glue them together with sugar glue if you want a 3D bottle.
Tip 2: Allow at least 2-3 days for drying time to avoid the fondant losing its shape.
Step 2 – Decorate the bottle:
You can paint the bottle with clear piping gel tinted burgundy (AmeriColor Gel Paste) if you want a shiny glass look but I just left it matte. For the label, I purchased an edible image but you may prefer to paint on the label yourself. Mark the label position before applying and lightly paint the area with water or edible glue.Tip 3: Pop the edible image in the freezer for 2 minutes before peeling off the backing paper.
Step 3 – Make the wood panels for the box at least 2 days ahead:
For the side panels of the box, make 2 shades of fondant, a light brown and beige . Rolled each color out into a thick snake them twist them together and kneaded it a little bit until it started to marble. Then rolled it out flat to around 3/16″ thick.
Tip 4: Don’t knead too much or else the marble will blend away. Rolling it out will help it marble more anyways.
Tip 5: You don’t want to roll it out too thin or else you risk the panels breaking apart.
Cut out 4 panels: 2 panels at 14″ x 4″ and 2 panels at 6″ x 4″. Lay them over parchment paper, then over a cookie tray to dry. Let it sit for about 5 minutes to dry a little then take some tools and score lines down it, poke holes into it, dent it, etc…just stress it out and get it to look like wood.
Tip 6: Letting the fondant sit for a couple minutes before scoring and marking it, it will help the design stay. If you start scoring it too early while the fondant is too soft and pliable, the marks will smooth away.
As for the base board, I used a 16″ x 8″ x 9mm thick MDF covered in decorator’s foil, firmly glued down with PVA wood glue.
Step 4 – Bake the cake 2 days ahead.
Dark Chocolate Mud Cake(from Planet Cake Cookbook)
Ingredients for 10″ square cake
330g butter
330g dk choc
35g coffee
240ml water
190g SR
190g plain
75g cocoa
.7tsp bicarb
720g caster
6 eggs
10.5 tsp oil
150ml buttermilk
Ganache
1800g dark chocolate
900ml pure cream
Dark Chocolate Mud Cake Method
Preheat the oven to 160C. Grease the tin and line the base and sides with a collar that extends 2 cm above the top of the tin.
Put the butter, chocolate, coffee and water in a saucepan and stir over low heat until melted, then remove from the heat.
Sift the flours, cocoa and bicarbonate of soda into a large bowl. Stir in the sugar and make a well in the centre. Add the combined egg, oil and buttermilk and the chocolate mixture, stirring with a large spoon until completely combined.
Pour the mixture into the tin and bake for 2 hours (for 11’5″cake) or until a skewer poked into the centre of the cake comes out clean, though it may be a little sticky. Leave the cake in the tin until cold.
Dark Chocolate Ganache Method
Blitz the chocolate in a processor till each piece is the size of a coffee granule and place in a large bowl
Put the cream in a saucepan and bring to boiling point. Pour the cream over the chopped chocolate and mix with a hand whisk until the ganache is smooth. (Do not use an electric whisk, as you will create too many air bubbles in the ganache.)
Allow to cool completely and then leave to set overnight.
Step 5 – Torte, fill, and crumb coat the cake 1 day ahead.
The side panels of the box were cut to make a box 14″ L x 6″ W x 4″ H. Cut the 10″ square Dark Chocolate Mud Cake to fit. Torte each layer to 1-1/4″ tall and filled with 1/2″ of Dark Chocolate Ganache = 3″ tall cake. Place the cake over a 14″ x 6″ set up board covered in foil. Use piping gel to help the cake and board stick together. Cover the cake with ganache using the board that the cake is sitting on as a guide to getting the correct thickness. Leave the cake overnight to harden and make it easier to work with.
Step 6 – Final Assembly:
Use a very sharp blade to trim each panel to size, if necessary, and gently press up against the side of the cake using edible glue to stick them on. Gently place the bottle in the middle and fill the area around it with white chocolate shavings.
The idea for this cake came from the Spiderman 4 wallpaper below
I copied the spider and the number 4 to cut out in black and red sugar paste.
If you would like a larger sized spider to print out just visit my ‘Free Stuff’ page.
The cake itself is a 7″ round Dark Chocolate Mud Cake filled and covered in Dark Chocolate Ganache and sugar-paste.
Ingredients
135g butter
135g dk choc
15g coffee
100ml water
75g SR
75g plain
30g cocoa
.3 tsp bicarb
295g caster
2.5 eggs
4.5 tsp oil
60ml buttermilk
Ganache
735g dark chocolate
365ml pure cream
Fondant
740g red sugar-paste, I used Cake Art coloured sugar-paste
75g black sugar-paste, I used Cake Art coloured sugar-paste
The fondant can be make by colouring white (Ready to Roll) RTR fondant such as Bakels or the supermarket alternative, Orchard with red gel colour such as Wilton gel or Americolor.
For directions on how to make the cake click here but please note that cooking time for the 7″ round cake is approximately 1hr 20mins at 150C. For more help making and using ganache click here.
I piped the spider’s web in black RI (Royal Icing). Click here for the recipe.
I used one quarter of the recipe (the egg powder recipe) and had more than enough. Use a 12″ piping bag with a #2 tip
To make the spider, roll out the black sugar-paste quite thinly and leave it for an hour or two to harden a little before cutting out your shapes using the template.
This was a small 5.5″ diameter cake to feed 10 children.
Dark Chocolate Mud Cake (from Planet Cake Cookbook)
Ingredients for 5.5″ cake
80g butter
80g dark choc
10g coffee
60ml water
50g SR
50g plain
20g cocoa
1/4 tsp bicarb
180g caster
1.5 eggs
3 tsp oil
40ml buttermilk
Dark Chocolate Ganache
450g dark chocolate, finely chopped
225ml pure cream
Fondant
RED: 600g sugar-paste to cover entire cake
GREY: 200g Background for mask and number plate
BLACK: 200g Mask and number
To find out how to make the mud-cake and ganache filling please visit my Ben Ten Cake blogTo Decorate your Transformer Cake
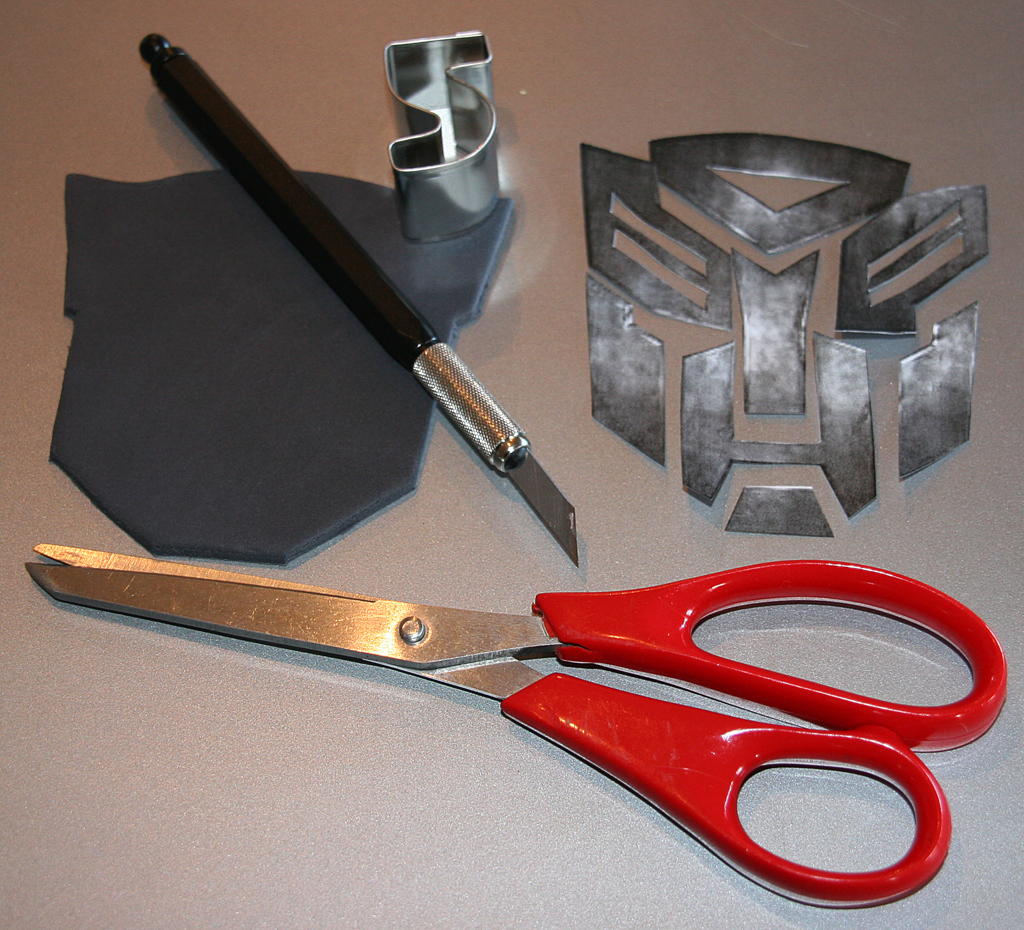
Download the shape below from here and resize to fit your cake if necessary and print it out. Then cut out the basic outline. Use this as a template to cut out a slightly larger (2 cms) shape which you will use to cut out the blank grey sugar-paste background for the mask.
Attach the grey shape to the cake using a little Royal Icing to stick it down.
Next, cut out all the separate pieces of the mask and use them as templates to cut out the pieces of black sugar-paste.
Attach each piece to the grey background making sure that the pieces are in the right place.
To make the plaque and the number 5, simply cut out a square of grey and attach it with some Royal Icing to the front of the cake.
Make an indent at each corner of the plaque with the end of a small paint brush (or similar) roll 4 small balls of grey sugar-paste and place in the holes with a tiny drop of water painted on as glue. Cut out a number 5 in black with a cutter and attach.
To transfer the letters onto the board just stick your printed word onto the board with sticky tape and trace round each letter with a pointed metal tip pressing quite heavily. You will see the imprint of the lettering on the board if you look closely.
Pipe the letters with some Royal Icing
I designed this image with a maori influence for a T-shirt printer in Burieigh.
Who would have thought I would be making a TF cake not long after!
When I am designing a new cake I like to gather all my ideas and resources together before I start.
I put all my images on one page and then take a screenshot. I have an iMac and I simply Preview/File/Take Screen Shot.
Screen Shot
Cake tin and cake boards
11.5″ diameter tin
11.5″ diameter thin card cake board. This board help you to move the cake around when you are decorating it and as the cake shrinks a little during baking, this board becomes a guide when ganaching. As you pull your spatula round the ganached cake to smooth it just press against the card board circle underneath as a guide and you will get the perfect thickness.
16″ diameter 6mm thick cake board. The cake will be heavy so you need a strong base. I use a pedestal base for this cake but I would normally have used a 6mm thick cake board.
Dark Chocolate Mud Cake (from Planet Cake Cookbook)
Ingredients for 11.5″ cake
359g butter
359g dk choc
41g coffee
261ml water
204g SR
204g plain
82g cocoa
.8 tsp bicarb
784g caster
6.5 eggs
11.4 tsp oil
163ml buttermilk
Dark Chocolate Ganache
Ingredients for 11.5″ cake
1960g dark chocolate, finely chopped
980ml pure cream
Fondant
GREY 1700g sugar-paste to cover entire cake and other bits and pieces.BLACK 500g cake details
GREEN 400g watch dial and trousers.
YELLOW: Lettering
WHITE: No.5 and figurine top
FLESH: Face and hands
BROWN: Hair
Dark Chocolate Mud Cake Method
Preheat the oven to 160C. Grease the tin and line the base and sides with a collar that extends 2 cm above the top of the tin.
Put the butter, chocolate, coffee and water in a saucepan and stir over low heat until melted, then remove from the heat.
Sift the flours, cocoa and bicarbonate of soda into a large bowl. Stir in the sugar and make a well in the centre. Add the combined egg, oil and buttermilk and the chocolate mixture, stirring with a large spoon until completely combined.
Pour the mixture into the tin and bake for 2 hours (for 11’5″cake) or until a skewer poked into the centre of the cake comes out clean, though it may be a little sticky. Leave the cake in the tin until cold.
Dark Chocolate Ganache Method
Put the chocolate pieces in a large bowl
Put the cream in a saucepan and bring to boiling point. Pour the cream over the chopped chocolate and mix with a hand whisk until the ganache is smooth. (Do not use an electric whisk, as you will create too many air bubbles in the ganache.)
Allow to cool completely and then leave to set overnight.
Baking Diary
DAY 1
Colour sugar-paste
Make ganache
Bake cake
Wrap cake in foil and place in fridge overnight. (I use my bar fridge as the temperature is not too low)
Cut finger nails. There is nothing worse than making a mark with your long nails on your completed cake just before your guests arrive
DAY 2
Take cake out of fridge first thing in the morning and allow to come to room temp.
Torte and ganache cake then leave it to set.
Once set cover with sugar-paste.
DAY 3
Decorate and complete the job.
DAY 4
Stuff up day. You never know what might happen when making a cake so always pencil in a stuff up day.
DAY 5
The day of the party
Day 1
Wilton Icing colour pastes, Bakels Ready to Roll (RTR) white sugar-paste in 7kg box and some left over coloured sugar-pastes from previous projects.
I like to keep sugar-paste in cheap freezer bags inside zip lock bags like these ones from IKEA
Add colour to the sugar-paste with a knife, cutting into the paste a little so that the colour doesn’t squidge out when you start to kneed it in. All up I used 28g of black Wilton icing colour on this cake. I had meant to buy ready made black sugar-paste but forgot that the online supplier was off till 10 Jan!
I actually made about 2200g of grey coloured sugar-paste first then converted 500g of it to black. Making the coloured sugar-paste early in the week gives the sugar-paste time to unwind and time for the colour to intensify. This picture is just the start of tinting to grey
Making the baking strips using Aluminium Foil and two old drying cloths (damp)
Tin is double lined and baking strips attached.
My lovely 6.7 litre Kenwood Major Titanium mixer
K beater up and batter ready to go!
Use a pastry brush (or similar) to ‘paint’ the top of the cake with boiled water to keep it moist and save cracking. Then cover with a clean tea cloth to reduce evaporation.
I remove the baking strips once they can be handled or use oven gloves to remove them.
Let cake cool completely before taking the cake out of the tin.
Wrap the cake well in cling film (do not squash cake) and put in fridge till morning.
Day 2
Covering the cake with sugar-paste
Excess trimmed off
Day 3
Design for top of cake
Cutting plan
Using the template to cut out the shapes
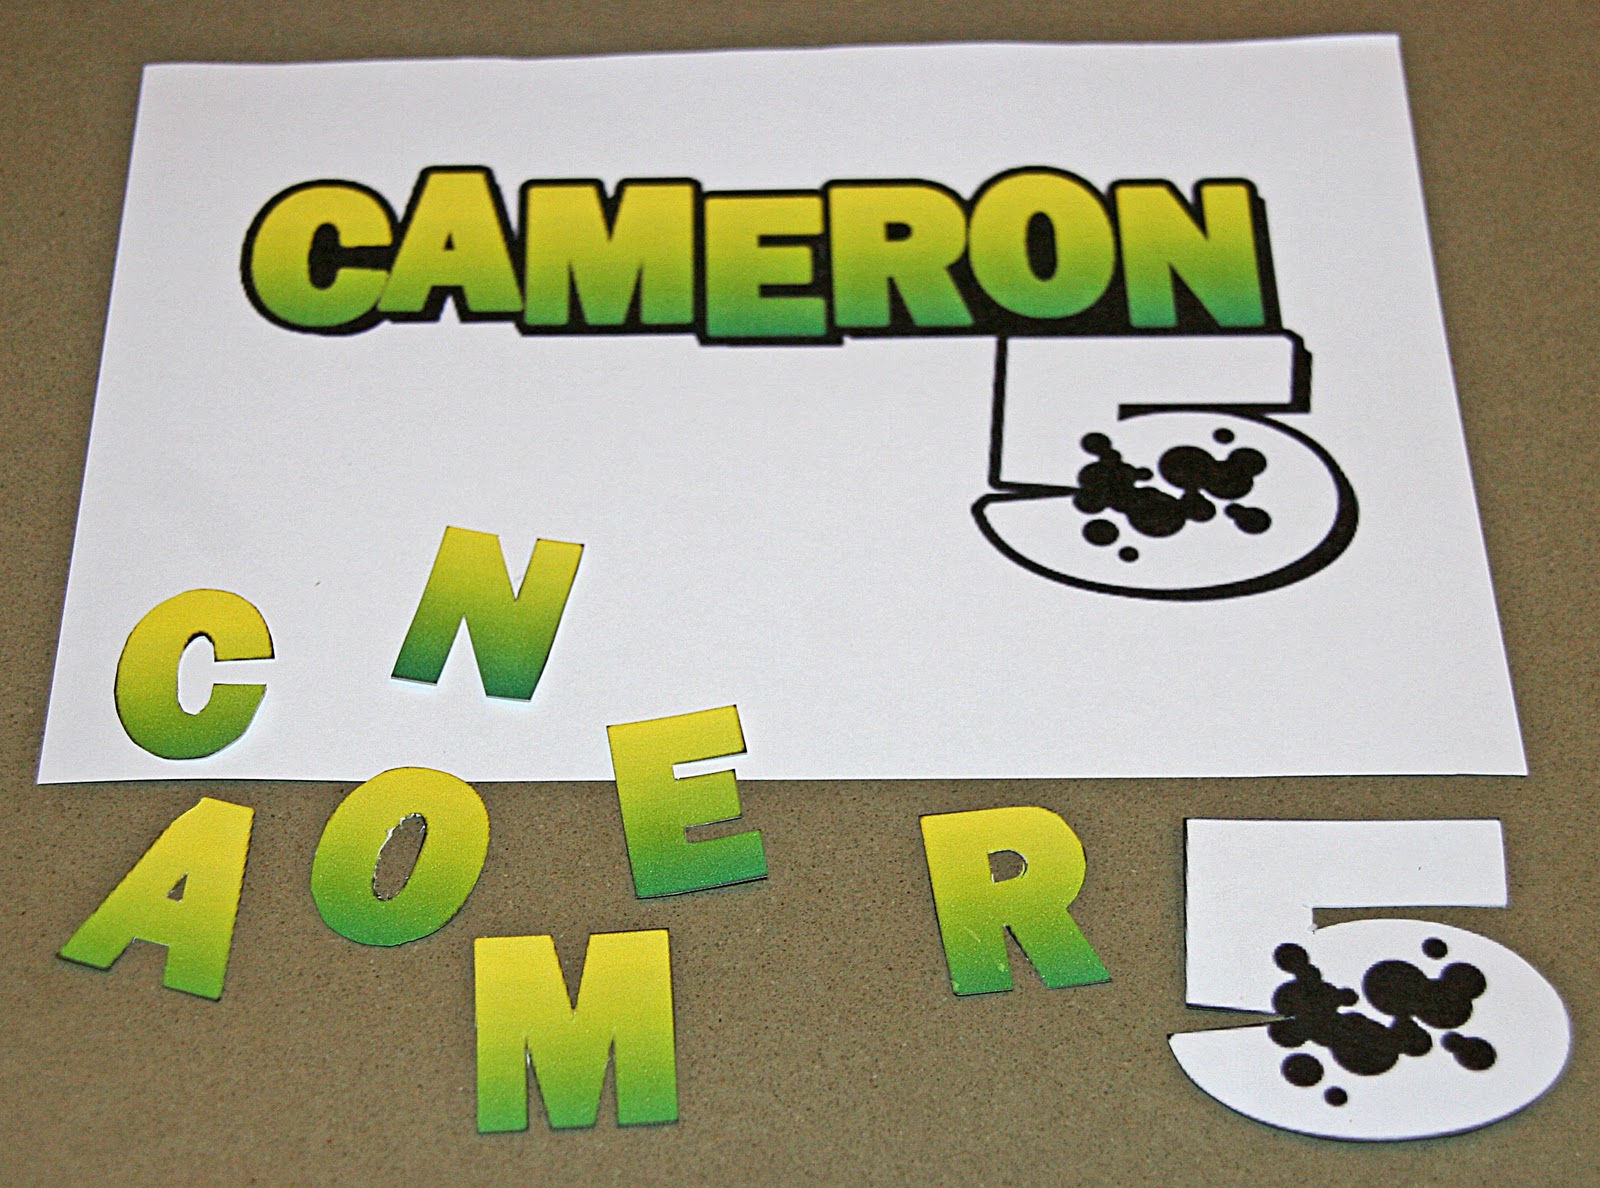
Ben 10 becomes Cameron 5
I used Franklin Gothic Heavy font in photoshop to get as close to the Ben 10 font as I could. I had to make the letters broader and the spaces between each letter much smaller. I also moved some letters up and down to make the effect a little crooked. All of this was done in the ‘Character box’. I then duplicated the layer and added a stroke and a drop shadow. Too easy!
Adding the lettering, one letter at a time.
Day 4
This is stuff up day so if everything has gone to plan you can put your feet up!
Day 5
Party time!
Figurine was made without Tylose powder. I forgot to buy some yet again. Baby Ben 10 would have looked so much better if I had added some of the Tylose powder to the sugar-paste.
 I made this cake for Slade’s 1st birthday and his Mum didn’t want anything too scary so no skull and cross bones on this cake. It was fun to make the cake and like many of my cakes I didn’t have any idea how it would turn out and just made decisions as to style and colour as I went along.
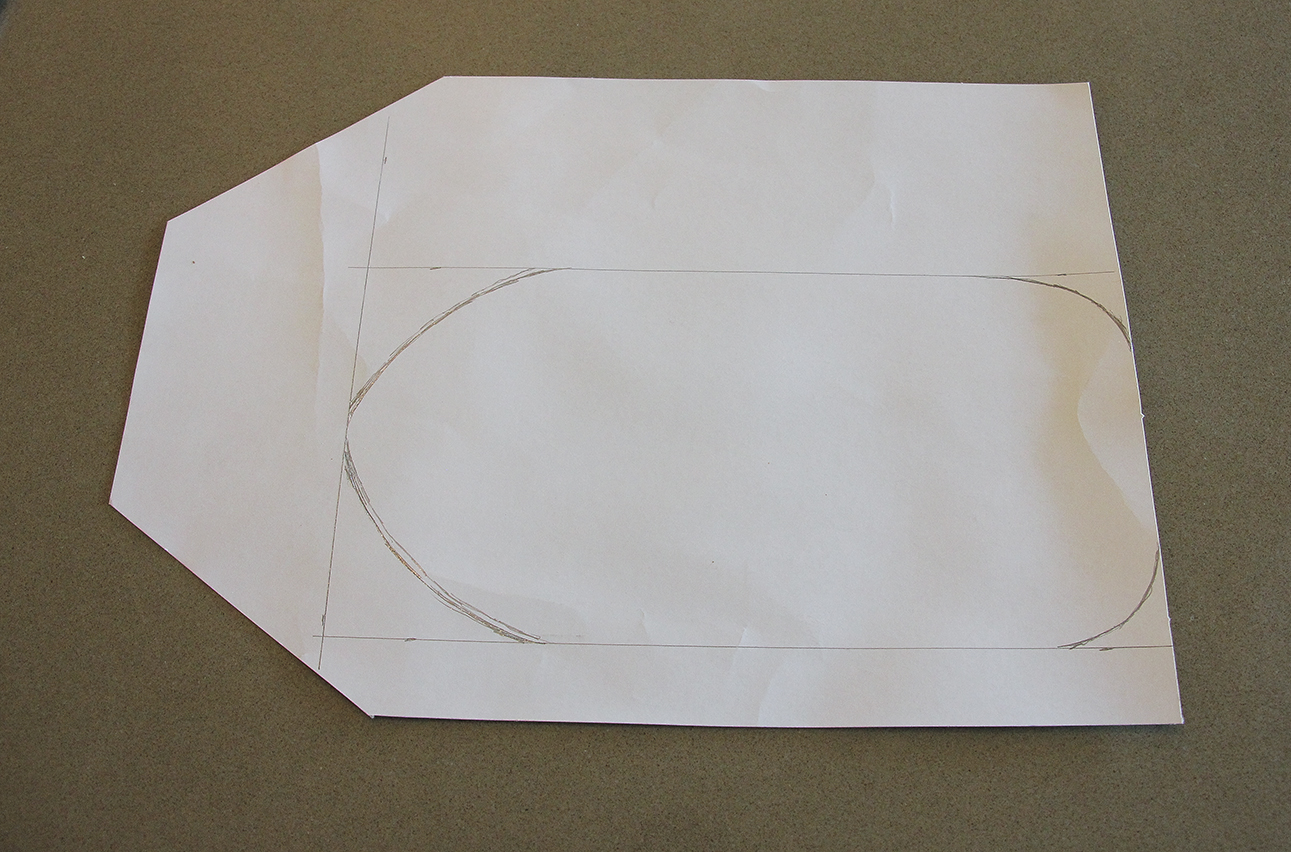


