Black and White Tiffany Wedding Cake

I made this cake for a wedding on the Gold Coast yesterday!
The top tier is a 10″ Hummingbird Cake filled with Cream Cheese Frosting and some Decorator’s Buttercream to go directly under the sugarpaste.
The bottom tier is a 12″ Dark Chocolate Jaffa Mud Cake filled and coated with Dark Chocolate Ganache and covered in sugarpaste.
Making and using black sugarpaste can be a nightmare and so for this special cake I purchased ‘Satin Ice’ Ready Made black sugarpaste. The white sugarpaste is Bakel’s.
Quantities of Sugarpaste
5 Kg white sugarpaste
1.3 Kg black sugarpaste
Three of the sketches used in the design stages.
Ingredients for the 12” square dark chocolate Jaffa mud cake 
500g butter
500g dk choc
55g coffee
360ml water (replace some of this with the juice of 2 oranges)
280g SR
280g plain
110g cocoa
1.5 tsp bicarb
1080g caster
9 eggs
Zest of 4 oranges
16 tsp oil
225ml buttermilk
Ganache
2700g dark chocolate
1350ml pure cream
Method for the dark chocolate Jaffa mud cake 
Preheat the oven to 160C (Fan Forced). Grease the tin and line the base and sides with a collar that extends 2 cm above the top of the tin. Add baking strips (made from damp cloths wrapped in tin foil) around the outside of the cake tin.
Put the butter, chocolate, coffee, water and fresh orange juice in a saucepan and stir over low heat until melted, then remove from the heat.
Sift the flours, cocoa and bicarbonate of soda into a large bowl. Stir in the sugar and make a well in the centre. Add the combined egg, orange zest, oil and buttermilk and the chocolate mixture, stirring with a large spoon until completely combined.
Pour the mixture into the tin and bake for 2 hours or until a skewer poked into the centre of the cake comes out clean, though it may be a little sticky.
Once removed from the oven, use a pastry brush (or similar) to brush the top of the cake with boiled water to keep it moist and save it from cracking and forming crusty bits on top. Then cover with a clean tea cloth to reduce evaporation. Repeat the brushing with boiled water step two or three times at half hour intervals as the cake cools.
Remove the baking strips once they can be handled or use oven gloves to remove them.

Let cake cool completely on a wire rack before taking the cake out of the tin.

Wrap the cake well in cling film (do not squash cake) and put in fridge till morning.
Method for dark chocolate ganache
  • Find out how to make ganache and fill / cover your cake with it Click Here

Ingredients for 10″ square Hummingbird Cake 

A 250ml measuring cup was used for this recipes.
440g can crushed pineapple in juice or syrup [or 62ml (1/4 cup) pineapple juice/syrup and 110g (1/2 cup) well-drained crushed pineapple]

300g (2 cup) self-raising flour
150g (1 cup) plain flour
1 teaspoon bicarbonate of soda (baking soda)
1 teaspoon ground cinnamon
6 large eggs (we use eggs with a minimum weight of 59g)
250ml (1 cup) oil (we use peanut oil, but any mild-flavored oil could be used)
780g (3 cup) mashed very ripe banana
450g (2 cups, firmly packed) brown sugar
170g (1 1/3 cup) pecan nuts, broken or chopped into pieces
Cream Cheese Frosting (to fill the cake)
245g (1 3/4 cups) icing sugar
40g butter
80g cream cheese
2 1/2 teaspoons (12.5ml) lemon juiceDecorator’s Buttercream (a nice firm buttercream to spread on the sides and top of cake)

(Very stable in very hot weather which we get in the summer here on the Gold Coast, Australia. Probably the best buttercream for covering the outside of cakes as it firms up nicely and forms a crust)

250g Lurpak butter
250g copha or solite
1 tbsp lemon juice
around 750g Pure icing sugar (just keep adding till you are happy with the consistency)
one and a half tablespoons of ‘Pavlova Magic’.
1/4 cup of water (don’t freak out if the icing seems to curdle, it comes together fine.)
Method for Hummingbird Cake

If using a can of crushed pineapple, empty the contents into a strainer over a medium bowl. Set aside to drain.

Grease a deep 10” square cake pan and line the base and sides with baking paper.
Preheat oven to 180 degrees Celsius (160 degrees Celsius fan-forced). If you are not using a fan-forced oven, adjust the oven rack to the lower half of the oven so the centre of the cake will be in the centre of the oven.
Stir or whisk self-raising flour, plain flour, bicarbonate of soda and cinnamon together in a large bowl until combined.
Measure 62ml (1/4 cup) pineapple juice/syrup and 110g (1/2 cup) pineapple flesh.
Place eggs, oil, banana, brown sugar, pecan nuts, crushed pineapple and pineapple juice in a large bowl. Stir the ingredients together until well combined.
Add banana mixture to flour mixture and stir until combined.
Pour batter into the prepared pan and smooth the surface with a spatula or the back of a spoon.
Bake cake for about 1 hour and 20 minutes, until a thin-bladed knife or wooden skewer inserted into the centre of the cake comes out without any batter attached.
Allow cake to cool in pan on a wire rack. Remove from pan.When cool cut in half and fill with Cream Cheese Frosting.

Cream Cheese Frosting

 Place icing sugar in a mixer and mix on high speed for a few seconds to remove any lumps. Add butter, cream cheese and lemon juice to the food processor. Process on medium speed for about 30 seconds. Stop the machine and use a spatula to scrape down the side of the bowl. Process for a further 15 seconds, or until the frosting is smooth and creamy. Make a dam of Decorator’s Buttercream around the edge of the cake and fill in the middle with the frosting.
Decorator’s Buttercream
Melt/soften the copha (make sure soft all the way through, or just melt) (Solite is already soft, so just add straight to the bowl).
Add copha/solite and softened butter to mixer, start mixing, add lemon juice.
Add the icing sugar a cup at a time, once combined add pav magic, and water. Leave to mix for about 10 minutes.
Smooth over the sides and top of the cake and leave till firm.
Covering the cake with sugarpaste
Knead some white icing to a pliable dough and roll it out to 3 mm (1/8 in) thick, using a large rolling pin.
Cover both cakes with white sugarpaste.Making the strips
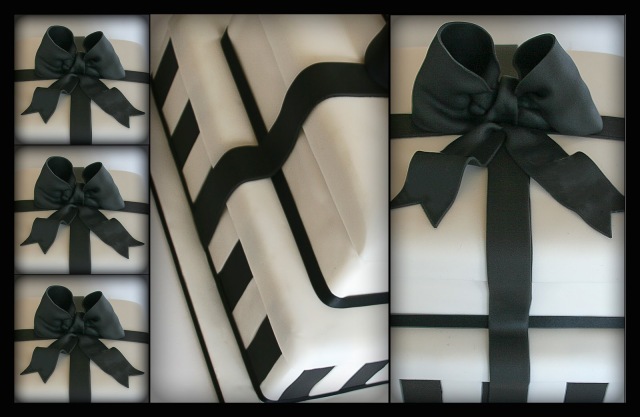
Cut out 3.5 cm wide strips of black and white sugarpaste the height of the cake. You will need 20 black strips and 16 white strips plus 4 white corner strips which you can custom cut to fit once all the other strips are in place. Start off each side by marking the midpoint and sticking the first black strip right in the middle.

Making the lids

Let the cakes sit for a couple of hours to allow the icing to dry before you make the lids. Brush the top of the cakes with a little water (or syrup) and run the brush around the top inch of the side of the cakes. Knead 700g of the white icing for the top box lid and 900g for the the bottom box lid.Once the dough is pliable, roll out each piece till they are at least 8 in larger than the width of each box. Roll the icing over your rolling pin, lift it up and roll it over the cake. Smooth the top and sides with a flexi-scraper. Use a ruler to mark the edge of the lid on all 4 sides. Trim the lid with a sharp knife.
Making the ribbon

Knead 500g of the black sugarpaste to a pliable dough and roll out. Measure length of ribbon needed. Cut out 4 strips of the required length by  3.5 cm wide. Trim one end of each ribbon into a point to help fit the ribbons together on top of the cake. Stick to the cake with water or edible glue and trim excess ends with a knife.


To make the bow simply follow this video.
Once the bow is completely dry use edible glue to stick it to your cake.

I hope you enjoy making the cake as much as I did.

Beach Cake Tutorial


This fabulous Beach Wedding Cake is covered in ivory sugarpaste and decorated with matching handmade and painted sugar-paste shells.


The bottom tier is a 10″ dark chocolate mud cake filled with dark chocolate ganache and the top tier is an 8″ white chocolate mud cake filled with white chocolate ganache.

Ingredients for 10” Dark Chocolate Mud Cake round
270g butter
270g dk choc
31g coffee
200ml water
155g SR
155g plain
60g cocoa
.6 tsp bicarb
590g caster
5 eggs
9 tsp oil
125ml buttermilk
 
Ganache
1475g dark chocolate
740ml pure cream
 
Fondant
1.475kg sugar-paste
 
Baking time
1 hr 50 mins
 
Method for Dark Chocolate Mud Cake click here

Ingredients for 8” White Chocolate Mud Cake round
240g butter
240g white choc
215ml water
120g SR
240g plain
315g caster
2.4 eggs
1.25 tsp vanilla
 
Ganache
1025g white chocolate
350ml pure cream
 
Fondant
1150g sugar-paste
Baking time
1 hr 20 mins
 

Method for White Chocolate Mud Cake click here

 
How to make ganache and cover your cake with it click here


Sugarpaste
I coloured all my sugarpaste at once using Wilton’s gel paste in Ivory.
1.475Kg for the bottom tier plus 1.150kg for top tier plus 500g for the shells

How to colour sugarpaste and use it to cover your cake click here 


How to assemble a 2 tiered cake click here 

I used Poly-Dowels from GlobalSugarArt.com to support my cake this time and found them easy to use. They are easy to cut with scissors and more hygienic than the wooden ones, I think.

Sea Shells
Using 500g of the ivory sugarpaste, I decided to make a 50/50 mix of sugarpaste/gumpaste (read ‘Successful Molding’ below for other suggestions for mediums to use with molds). I used the recipe below for gumpaste but only used half the quantities to achieve a 50/50 mix.


I used 3 First Impressions Molds which I ordered from America from GlobalSugarArt.com


S102 4 Shell Set
S188 Shell Set 6 (21398)
Clam Shell Press 2 pc.


I made 10 of each shell making a total of 130 shells.


Gumpaste Ingredients:

 
500 grams of sugarpaste (I use Bakels Pettinice, but any will do)
 
2 teaspoons of Cellogen (if you use CMC, Tylose or Gum Trag then only use 1 to 1.5 teaspoons)
 
1/3 teaspoon raw egg white
 
2 teaspoons Cream of Tartar
 
Instructions:
 
Use a little Crisco (here in Australia I use Copha which is a solid white vegetable oil) on your work surface and knead up your sugarpaste so its nice and soft.
 
Sprinkle the Cellogen, or alternative, over the work surface and knead it into the fondant.
 
Make a well in the mix and pour in the egg white, knead until mixed through, it may feel a little sticky, add more Crisco to the surface if you need to or some icing sugar to stop it sticking to your hands.
 
Sprinkle the Cream of Tartar on the work surface and knead into the mix until all incorporated.

(Thanks to Fran for this gumpaste recipe which I have adapted a little.)


Successful Molding by Alan Tetreault
GlobalSugarArt.com


Successful molding using silicone molds is all dependent on the medium you choose. Many decorators call me in frustration that they cannot get a good impression with a silicone mold using sugarpaste.  Generally, for larger or detailed molds, I recommend using at least a 50/50 mix of gumpaste and sugarpaste.  If the mold has a lot of details or undercuts (details that are cut out of the mold that you cannot see from the opening) I use 100% gumpaste.  On a large mold that is very detailed, I recommend adding Tylose to gumpaste to make a very firm and strong gumpaste.  The more detailed the mold, the firmer the gumpaste should be to achieve the best results.  Here are my suggestions:

 
It helps to use a small dot of shortening (Crisco) on our fingertips while pushing the sugarpaste or gumpaste into the mold.
 
1.  For small molds that you want to be able to cut through or eat, use only sugarpaste.  For each pound of sugarpaste, knead in about one cup of confectionery sugar or enough so that the fondant no longer sticks to your hands or the surface you are kneading on.  This will make molding easier and you can handle the finished product without it stretching out of shape.  This also works well on side designs, drapes and borders that you are molding with a silicone mold.  Adding a flavoring to the fondant (like orange, lemon, almond, peppermint, etc.) can be a nice finishing touch.  Especially since it is usually the children that try to eat the decorations!  Freezing the molded fondant for 5-15 minutes before removing helps keep the detail.
 
2. For larger figurines, flowers and borders like pearls and ropes, I recommend a mixture of 50% gumpaste and 50% fondant kneaded together.  This makes a mold that can still be cut through with a knife when you serve the cake but you may not want to eat the pieces.  Freezing the molded fondant for 5 -15 minutes before removing from the mold helps with removal and keeps the detail.
 
3.  For large molds or molds that have undercuts, I use all gumpaste.  Freeze 10 minutes before removing from mold.4.  For very large or detailed molds, I add 1-2 teaspoons of Tylose to one pound of gumpaste and knead it well. Allow it to rest overnight in the refrigerator in a sealed bag.  The next day, break off a piece and knead it well before using it to make a mold.  It will be very firm. Freeze 10-15 minutes before removing from the mold.


These shells were molded using 50/50 gumpaste/sugarpaste with no added confectioners sugar.  
I placed the filled mold in the freezer for 15 minutes then removed the shells from the mold and lightly dusted with non toxic Luster Dust in Spanish Moss (bronze metallic look) by Sunflower Sugar Art from GlobalSugarArt.com. I used a paintbrush to apply the dust.


This YouTube clip will give you a good idea how to use silicon molds even though it shows a baby mold and not a shell mold.

 
Leave the shells to dry for at least 24 hours before gluing them onto the cake with edible glue
Edible Glue
Also called Gum Glue
Add 2 tablespoons of warm water to a quarter teaspoon of Tylose Powder and allow the Tylose powder to melt. Don’t worry if at this stage the glue appears not to be blending. Put a lid on the container and leave it in the refrigerator overnight and in the
morning you will have a perfectly clear and ready to use glue.
 
The glue should be a dripping consistency. If it is too thick, just add a little more water and stir with a toothpick .
 
The edible glue should be stored in the refrigerator when not in use.
 
To apply the glue, use a good quality paintbrush and brush on to the area where you are going to be working. Leave until it begins to dry a little so that the area is just tacky to touch.
 
I left 16 assorted shells to place around the cake and sprinkled some raw caster sugar to look like sand.

 
I hope you like my cake and try making one yourself. Please share your efforts with me as I would love to see what you come up with.

Pink Tiffany Wedding Cake Tutorial

This cake was made up of two square tiers. The bottom tier was an 11″ dark chocolate mud cake with dark chocolate ganache and the top tier was a 9″ white chocolate mud cake with white chocolate ganache.

Ingredients for the 9″ square white chocolate mud cake

400g butter

400g white chocolate

350ml water
400 plain flour
200g SR flour
520g caster suger
4 eggs
2 tsp vanilla

White chocolate ganache

1700g white chocolate
600ml pure cream
Fondant
1700g sugar-paste

Method for the 9″ square white chocolate mud cake 

(adapted from Planet Cake Cookbook)
Preheat oven to 180C. Grease tin and line the base and sides with a collar of baking paper that extends 2 cm above the top of the tin. Add baking strips (made from damp cloths wrapped in tin foil) around the outside of the cake tin. Put the butter and water in a saucepan over medium heat and stir until butter has melted. Turn off the heat, then add the chocolate and stir until it has melted and is well combined.
Sift the flours together in a bowl. Add the sugar, a pinch of salt and make a well in the centre.
Pour the chocolate mixture, egg and vanilla into the well then stir with a wooden spoon until well combined.
Pour into the cake tin, Bake for 1 hour 45 minutes or until the cake is golden brown and a skewer comes out clean when poked into the middle of the cake. Cover with foil halfway through if the cake is browning too quickly.
Once removed from the oven, use a pastry brush (or similar) to brush the top of the cake with boiled water to keep it moist and save it from cracking and forming crusty bits on top. Then cover with a clean tea cloth to reduce evaporation. Repeat the brushing with boiled water step two or three times at half hour intervals as the cake cools. Remove the baking strips once they can be handled or use oven gloves to remove them.

Let cake cool completely on a wire rack before taking the cake out of the tin.

Wrap the cake well in cling film (do not squash cake) and put in fridge till morning.
Method for white chocolate ganache

  1. Process chocolate till it resembles breadcrumbs and place in a large bowl
  2. Put the cream in a saucepan and bring to a rolling boil. Pour the cream over the chocolate and mix with a hand whisk until the ganache is smooth. (Do not use an electric whisk, as you will create too many air bubbles in the ganache.)
  3. Allow to cool completely and then leave to set overnight.

Ingredients for the 11” square dark chocolate mud cake 

440g butter
440g dk choc
50g coffee
320ml water
250g SR flour
250g plain
100g cocoa
1 tsp bicarb
960g caster
8 eggs
14 tsp oil
200ml buttermilk

Ganache

2400g dark chocolate
1200ml pure cream

Fondant

2.6kg sugar-paste
Method for the 11” square dark chocolate mud cake 
Preheat the oven to 160C. Grease the tin and line the base and sides with a collar that extends 2 cm above the top of the tin. Add baking strips (made from damp cloths wrapped in tin foil) around the outside of the cake tin.

Put the butter, chocolate, coffee and water in a saucepan and stir over low heat until melted, then remove from the heat.

Sift the flours, cocoa and bicarbonate of soda into a large bowl. Stir in the sugar and make a well in the centre. Add the combined egg, oil and buttermilk and the chocolate mixture, stirring with a large spoon until completely combined.

Pour the mixture into the tin and bake for 2 hours (for 11.5″cake) or until a skewer poked into the centre of the cake comes out clean, though it may be a little sticky.
Once removed from the oven, use a pastry brush (or similar) to brush the top of the cake with boiled water to keep it moist and save it from cracking and forming crusty bits on top. Then cover with a clean tea cloth to reduce evaporation. Repeat the brushing with boiled water step two or three times at half hour intervals as the cake cools.
Remove the baking strips once they can be handled or use oven gloves to remove them.

Let cake cool completely on a wire rack before taking the cake out of the tin.

Wrap the cake well in cling film (do not squash cake) and put in fridge till morning.
  1. Process chocolate till it resembles breadcrumbs and place in a large bowl
  2. Put the cream in a saucepan and bring to a rolling boil. Pour the cream over the chocolate and mix with a hand whisk until the ganache is smooth. (Do not use an electric whisk, as you will create too many air bubbles in the ganache.)
  3. Allow to cool completely and then leave to set overnight.

Making the lids

Let the cakes sit for a couple of hours to allow the icing to dry before you make the lids.
Brush the top of the cakes with a little water (or syrup) and run the brush around the top inch of the side of the cakes.
Knead 400g of the pink icing for the top box lid and 600g of pink for the the bottom box lid.
Once the dough is pliable, roll out each piece till they are at least 8 in larger thad the width of each box. Roll the icing over your rolling pin, lift it up and roll it over the cake. Smooth the top and sides with a flexi-scraper. Use a ruler to mark the edge of the lid on all 4 sides.
Trim the lid with a sharp knife.

Making the ribbon

Knead 500g of the white sugar-paste to a pliable dough and roll out to 16 x 40 cm rectangle. Cut into 4 long 4 cm wide strips. Trim one end of each ribbon into a point to help fit the ribbons together on top of the cake. Stick to the cake with water and trim excess ends with a knife.

Making the bow

Instructions on making the bow can be found on this video.