Lace Wedding Cake Tutorial

Champagne and Lace

This fabulous cake took a good many hours to complete but I think it was worth every minute of my time.

Here are the dimensions of the cakes I made…………

4″ round x 3.5″ high:
5″ round x 4.5″ high:
6″ Dummy tier x 3″ high:
8″ round x 4.5″ high.
You could alter these sizes a little with no great consequence.

I would like to show you how to achieve a stunning lace effect on a cake using stencils and piping.
To get the best possible results use a different colour of stencil icing from the colour of your cake.

Champagne and Lace

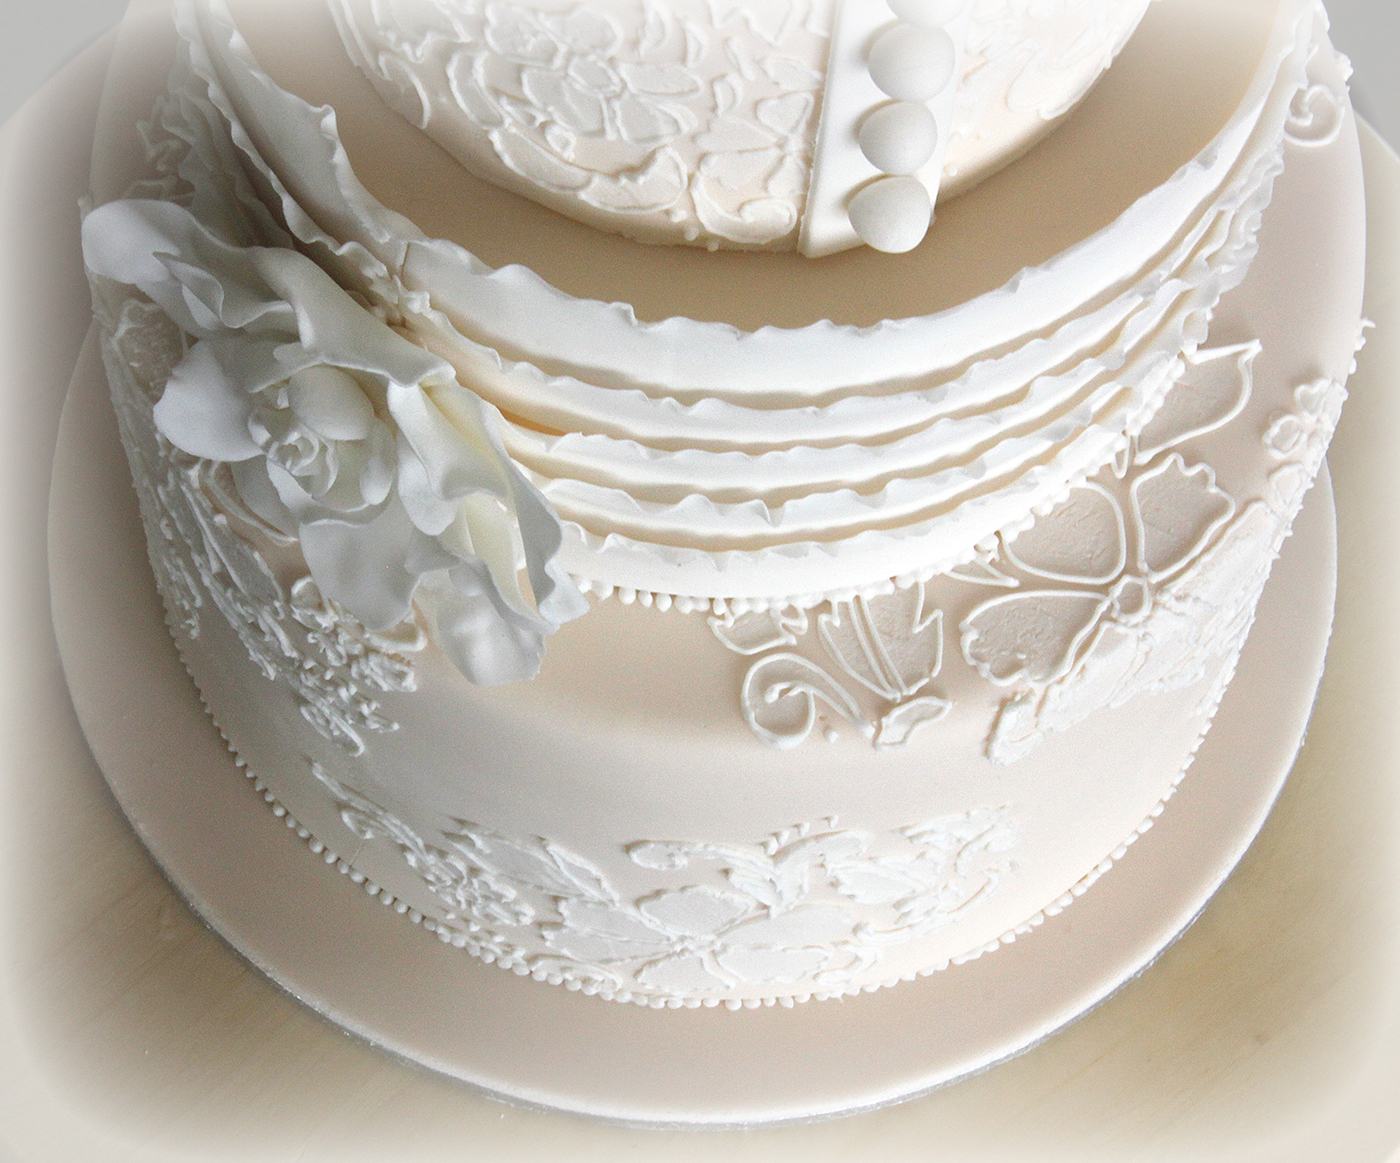
This cake is champagne and the Icing for the stencil is white.

Stencil pack

I used 3 of the set of 4 Designer Stencils.

3 stencils
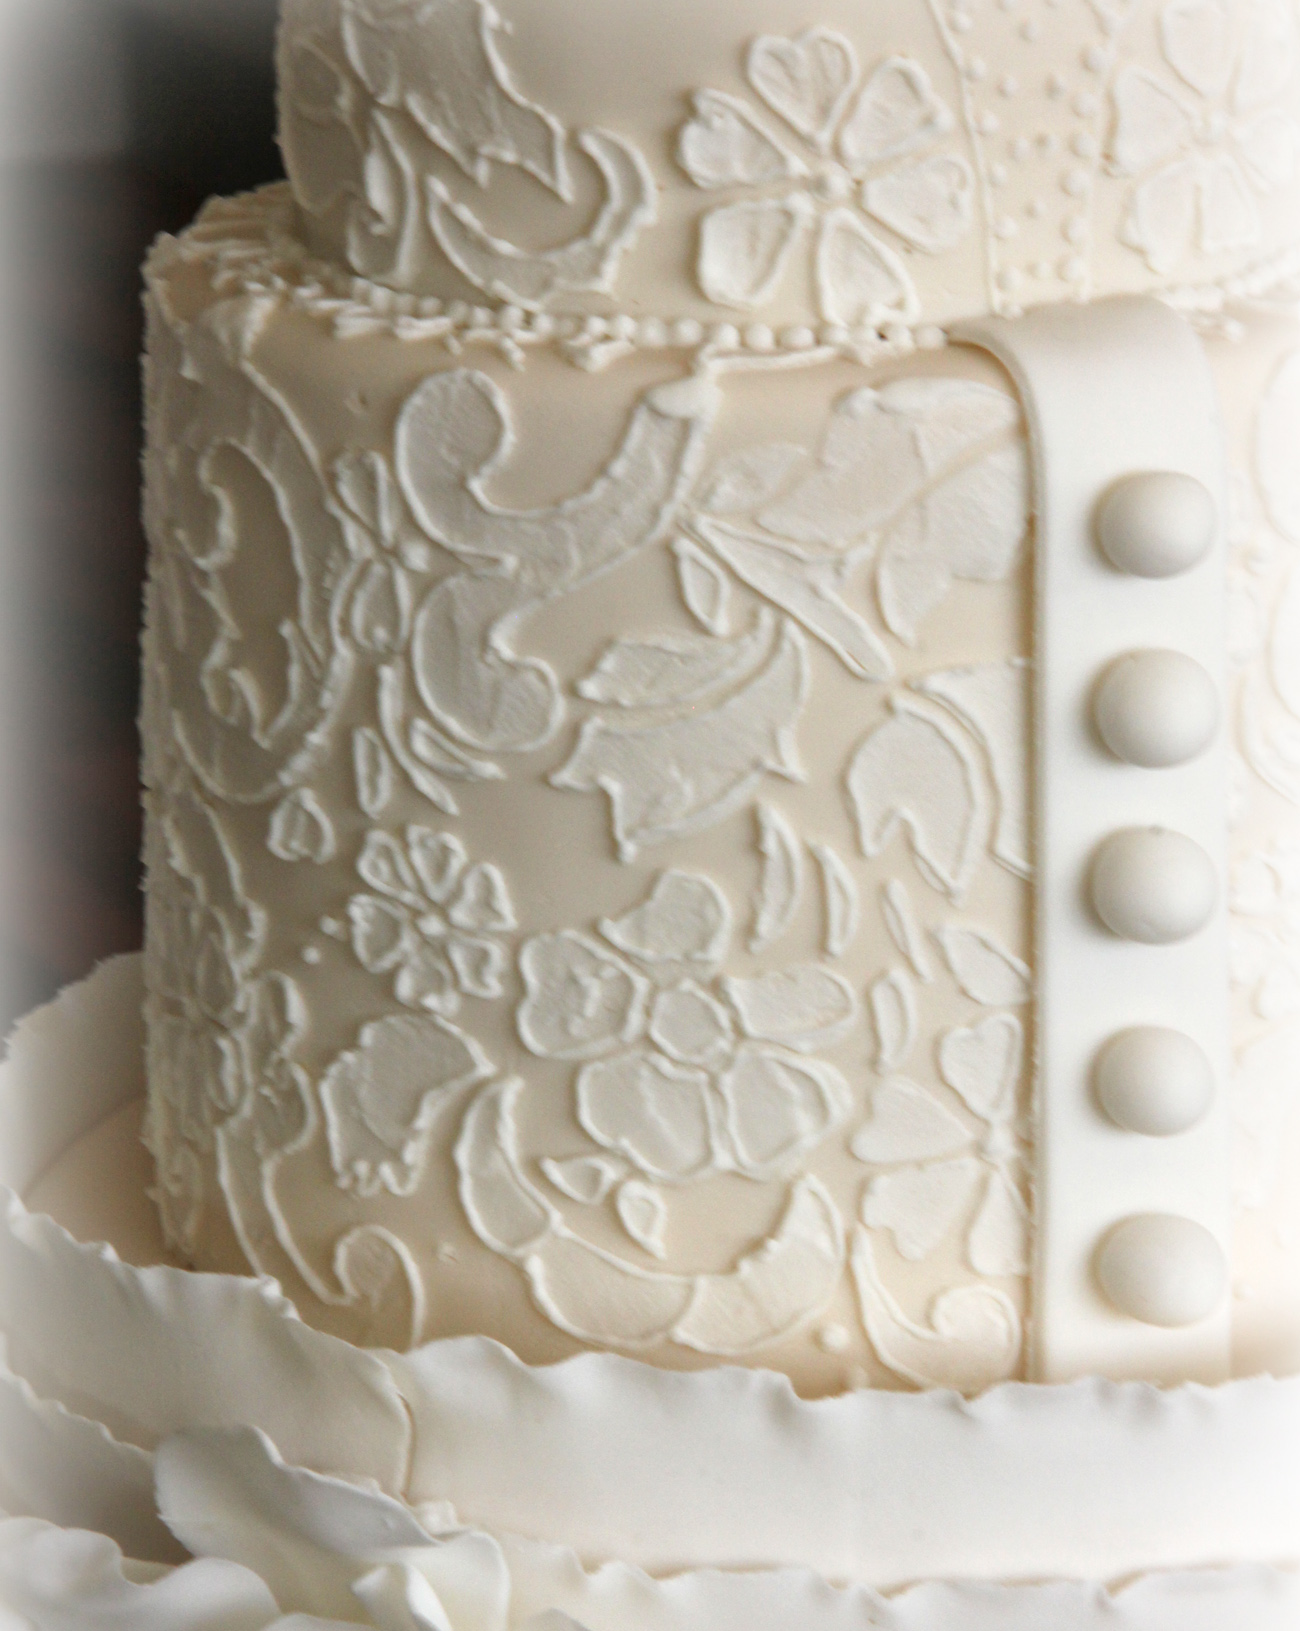
I will be stencilling the second from top tier of this 4 tiered cake, the tier with the buttons.

Champagne and Lace

As this tier will be stencilled all over I will need to position my stencil vertically and fix in position with pins or tooth picks.
Mix up some white Royal Icing (RI) till it forms soft peaks and apply a thin coat using a bendy scrapper.

Stencilling

I made my scrappers in various widths from square and rectangular Lurpak / margarine tubs.

Bendy Scrapers 1mb
You can remove the stencil before it dries. You will, however, need to wait till the RI dries before re-attaching the stencil for the next section (5 – 10 mins)
Once you have stencilled the sides of the cake, this tier requires that you stencil on top. Try to align the stencil with the pattern on the sides and complete in segments.
To get the full lace effect on your finished cake you will need to outline all the stencilled flowers and leaves with RI using a piping bag fitted with a small tip ( 00, 0 or 1 ). This is very time consuming but gives a fabulous lacy texture to your cake.

Champagne and Lace

Tier with buttons 1mb


Champagne and Lace

Champagne and Lace


Champagne and Lace
Please also visit my website at http://www.cutesweetthings.com to purchase a cake or just to browse my cake galleries.

Beach Cake Tutorial


This fabulous Beach Wedding Cake is covered in ivory sugarpaste and decorated with matching handmade and painted sugar-paste shells.


The bottom tier is a 10″ dark chocolate mud cake filled with dark chocolate ganache and the top tier is an 8″ white chocolate mud cake filled with white chocolate ganache.

Ingredients for 10” Dark Chocolate Mud Cake round
270g butter
270g dk choc
31g coffee
200ml water
155g SR
155g plain
60g cocoa
.6 tsp bicarb
590g caster
5 eggs
9 tsp oil
125ml buttermilk
 
Ganache
1475g dark chocolate
740ml pure cream
 
Fondant
1.475kg sugar-paste
 
Baking time
1 hr 50 mins
 
Method for Dark Chocolate Mud Cake click here

Ingredients for 8” White Chocolate Mud Cake round
240g butter
240g white choc
215ml water
120g SR
240g plain
315g caster
2.4 eggs
1.25 tsp vanilla
 
Ganache
1025g white chocolate
350ml pure cream
 
Fondant
1150g sugar-paste
Baking time
1 hr 20 mins
 

Method for White Chocolate Mud Cake click here

 
How to make ganache and cover your cake with it click here


Sugarpaste
I coloured all my sugarpaste at once using Wilton’s gel paste in Ivory.
1.475Kg for the bottom tier plus 1.150kg for top tier plus 500g for the shells

How to colour sugarpaste and use it to cover your cake click here 


How to assemble a 2 tiered cake click here 

I used Poly-Dowels from GlobalSugarArt.com to support my cake this time and found them easy to use. They are easy to cut with scissors and more hygienic than the wooden ones, I think.

Sea Shells
Using 500g of the ivory sugarpaste, I decided to make a 50/50 mix of sugarpaste/gumpaste (read ‘Successful Molding’ below for other suggestions for mediums to use with molds). I used the recipe below for gumpaste but only used half the quantities to achieve a 50/50 mix.


I used 3 First Impressions Molds which I ordered from America from GlobalSugarArt.com


S102 4 Shell Set
S188 Shell Set 6 (21398)
Clam Shell Press 2 pc.


I made 10 of each shell making a total of 130 shells.


Gumpaste Ingredients:

 
500 grams of sugarpaste (I use Bakels Pettinice, but any will do)
 
2 teaspoons of Cellogen (if you use CMC, Tylose or Gum Trag then only use 1 to 1.5 teaspoons)
 
1/3 teaspoon raw egg white
 
2 teaspoons Cream of Tartar
 
Instructions:
 
Use a little Crisco (here in Australia I use Copha which is a solid white vegetable oil) on your work surface and knead up your sugarpaste so its nice and soft.
 
Sprinkle the Cellogen, or alternative, over the work surface and knead it into the fondant.
 
Make a well in the mix and pour in the egg white, knead until mixed through, it may feel a little sticky, add more Crisco to the surface if you need to or some icing sugar to stop it sticking to your hands.
 
Sprinkle the Cream of Tartar on the work surface and knead into the mix until all incorporated.

(Thanks to Fran for this gumpaste recipe which I have adapted a little.)


Successful Molding by Alan Tetreault
GlobalSugarArt.com


Successful molding using silicone molds is all dependent on the medium you choose. Many decorators call me in frustration that they cannot get a good impression with a silicone mold using sugarpaste.  Generally, for larger or detailed molds, I recommend using at least a 50/50 mix of gumpaste and sugarpaste.  If the mold has a lot of details or undercuts (details that are cut out of the mold that you cannot see from the opening) I use 100% gumpaste.  On a large mold that is very detailed, I recommend adding Tylose to gumpaste to make a very firm and strong gumpaste.  The more detailed the mold, the firmer the gumpaste should be to achieve the best results.  Here are my suggestions:

 
It helps to use a small dot of shortening (Crisco) on our fingertips while pushing the sugarpaste or gumpaste into the mold.
 
1.  For small molds that you want to be able to cut through or eat, use only sugarpaste.  For each pound of sugarpaste, knead in about one cup of confectionery sugar or enough so that the fondant no longer sticks to your hands or the surface you are kneading on.  This will make molding easier and you can handle the finished product without it stretching out of shape.  This also works well on side designs, drapes and borders that you are molding with a silicone mold.  Adding a flavoring to the fondant (like orange, lemon, almond, peppermint, etc.) can be a nice finishing touch.  Especially since it is usually the children that try to eat the decorations!  Freezing the molded fondant for 5-15 minutes before removing helps keep the detail.
 
2. For larger figurines, flowers and borders like pearls and ropes, I recommend a mixture of 50% gumpaste and 50% fondant kneaded together.  This makes a mold that can still be cut through with a knife when you serve the cake but you may not want to eat the pieces.  Freezing the molded fondant for 5 -15 minutes before removing from the mold helps with removal and keeps the detail.
 
3.  For large molds or molds that have undercuts, I use all gumpaste.  Freeze 10 minutes before removing from mold.4.  For very large or detailed molds, I add 1-2 teaspoons of Tylose to one pound of gumpaste and knead it well. Allow it to rest overnight in the refrigerator in a sealed bag.  The next day, break off a piece and knead it well before using it to make a mold.  It will be very firm. Freeze 10-15 minutes before removing from the mold.


These shells were molded using 50/50 gumpaste/sugarpaste with no added confectioners sugar.  
I placed the filled mold in the freezer for 15 minutes then removed the shells from the mold and lightly dusted with non toxic Luster Dust in Spanish Moss (bronze metallic look) by Sunflower Sugar Art from GlobalSugarArt.com. I used a paintbrush to apply the dust.


This YouTube clip will give you a good idea how to use silicon molds even though it shows a baby mold and not a shell mold.

 
Leave the shells to dry for at least 24 hours before gluing them onto the cake with edible glue
Edible Glue
Also called Gum Glue
Add 2 tablespoons of warm water to a quarter teaspoon of Tylose Powder and allow the Tylose powder to melt. Don’t worry if at this stage the glue appears not to be blending. Put a lid on the container and leave it in the refrigerator overnight and in the
morning you will have a perfectly clear and ready to use glue.
 
The glue should be a dripping consistency. If it is too thick, just add a little more water and stir with a toothpick .
 
The edible glue should be stored in the refrigerator when not in use.
 
To apply the glue, use a good quality paintbrush and brush on to the area where you are going to be working. Leave until it begins to dry a little so that the area is just tacky to touch.
 
I left 16 assorted shells to place around the cake and sprinkled some raw caster sugar to look like sand.

 
I hope you like my cake and try making one yourself. Please share your efforts with me as I would love to see what you come up with.