Ballerina Shoes Cake

Ballet shoes cake
Ballet shoes cake

This 9″ Ballerina Shoes birthday cake is made from dark chocolate mud-cake and filled with dark chocolate ganache.

Materials

0.5 metres of 1 metre wide net

Glue gun

14″ cake board

2 x 9″ set up boards

Super Pearl Dust (Sweet Inspirations)

Hot Pink Twinkle dust (Global Sugar Art)

Clay gun

1.2 kg white sugar-paste

300g pink sugar-paste

Quilting mold

silver edible balls

Tylose powder

Make the 9″ round Dark Chocolate Mud Cake

500g unsalted butter
400g dark chocolate
10g (2 tablespoon) instant coffee
2-2/3 cups warm water
380g (2 cup) caster sugar
520g (3 cups) self raising flour
60g (1/2 cup) cocoa
4 eggs
2 teaspoon vanilla
1. Grease and line base and sides of cake pan with one thickness of baking paper, bringing paper 5cm above side of pan.
2. Combine chopped butter, chopped chocolate, coffee, and water in a saucepan.
Stir over low heat until chocolate is melted. Cool 15 minutes. Transfer mixture to bowl of mixer.
3. Add caster sugar to mixture and beat well until dissolved. Add sifted flour and cocoa, lightly beaten eggs and vanilla.
4. Pour mixture into prepared pan.
5. Bake at 150C for 1 hour 45 mins. Test with skewer. Cool cake in pan.

Make the Dark Chocolate Ganache

1.2 kg (2lb 10oz) dark chocolate, finely chopped

500ml (17.5 fl oz) pure cream

Method: Heat the cream until it just starts to bubble, pour over chocolate (which you have blitzed in the food processor to coffee granules size) and let it sit for about a minute to melt. Use a hand whisk to blend it all together then set aside to cool.
Your ganache at this point will be thin. You will have to let it set overnight until it thickens to a slightly thicker peanut butter consistency. Since I don’t have the patience to wait, I just let it cool to room temperature and then pop it in the fridge (don’t cover because you might get condensation). It would  usually set in the fridge in about an hour or two. If it sets too hard, just microwave it in 10 second intervals (keep mixing it whenever you take it out).
For more information on how to make ganache and cover your cake with it, please click here.
Assembling the cake
Cut the cake in half and fill with ganache.
Attach cake to set up board with edible glue or some Royal Icing.
Cover the top and the sides of the cake with ganache and smooth the surfaces.
Cover in white sugar-paste.
Press a quilting mold to the sides of the cake to make quilting effect or measure and indent with the side of a ruler.
Brush the top and sides of the cake with Super Pearl dust.
Use the other end of a paint brush to make holes for the silver balls and use some edible glue to attach them.
Add any lettering at this stage.

To make edible glue

Add 2 tablespoons of warm water to a quarter teaspoon of Tylose Powder and allow the Tylose powder to melt. Don’t worry if at this stage the glue appears not to be blending. Put a lid on the container and leave it in the refrigerator overnight and in the morning you will have a perfectly clear and ready to use glue.
The glue should be a dripping consistency. If it is too thick, just add a little more water and stir with a toothpick .
The edible glue should be stored in the refrigerator when not in use.
To apply the glue, use a good quality paintbrush and brush on to the area where you are going to be working. Leave until it begins to dry a little so that the area is just tacky to touch.

To make the tutu

Cut the net into 2 strips each 15 cms wide.

Join the strips with pins to make a 2 metre length then machine stitch along one long edge with the largest stitch on your machine.

Pull one of the threads to gather the fabric into the tightest circle possible and sew in place.

Place tutu onto a 14″ cake board and glue down with a glue gun.

Use a  9″ set up board to sit on top and glue this on with a glue gun. Place a 5 kilo bag of flour (or something heavy) on top till set.

Trim your tutu so that it sticks out about 1 cm from the edge of your cake board.

Place your cake (which should be on a matching 9″ set up board) on top using your glue gun or PVA glue to stick it down.

Ballet Shoe template

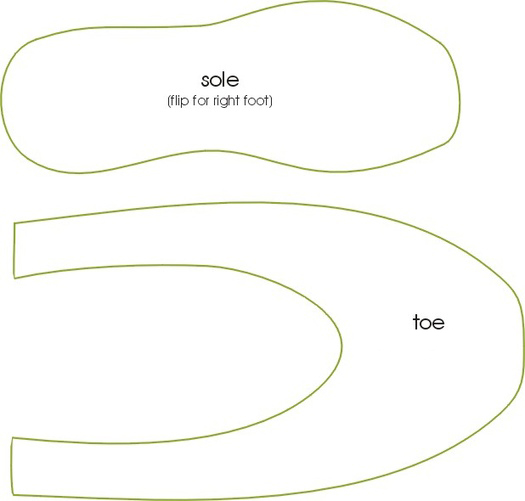
To make the Ballet Shoes

Print out the shoe template onto thin card so that the sole measures 14 cm in length and cut them out.

Use the templates to cut out 2 soles and two toes in pink sugar-paste and remember as we work through the rest of the instructions that you are aiming to make a left and right shoe.

Use edible glue to attach the uppers to the soles. I turned a little of the edge of the upper under the sole but I think it might have looked better just to join them edge to edge.

Fill the shoes with cotton wool to keep their shape (the cotton wool stuck a little to some glued edges so I would recommend scrunched cling film instead).

Leave shoes overnight to harden.

Next day remove packing and add the stitched band around the top of the shoe by cutting and glueing a narrow strip of pink sugar-paste around the top edge of each shoe and use a cocktail stick to make the little holes.

Making the shoes
Making the shoes

Use the clay gun to make the little bows and glue them in place with edible glue.

Dust the shoes inside and out with pink twinkle dust and attach to cake with edible glue. I also used a cocktail stick to anchor the toe of the angled shoe to the cake as the cake was travelling by car to the birthday girl.

Cut out 4 long strips of pink sugar-paste to make the ribbon ties and dust them on both sides before glueing them to the shoes.

Brush more pink dust over the shoes where needed.

Ballet shoes cake topper
Ballet shoes cake bow

Use a ribbon in the same shade as the tutu, around the base of the cake and make a bow for the front.

Ballet shoes cake top
Ballerina Shoes Cake

Easter Cookie Tutorial

These cookies are iced using the ‘Outlining and Flooding’ technique which is simple to learn. The outline works as a dam or wall to hold the runny icing which you use to fill in the main parts of the cookie.
I made these cookies in 3 delightful flavours: chocolate, vanilla and gingerbread.
 

Chocolate Cookie Recipe

makes about 24 medium-sized cookies
275g plain flour
100g self raising flour
75g cocoa powder
125g granulated sugar
125g salted butter, diced
125g golden syrup
1 large egg, beaten
Sift flours and cocoa, add sugar and mix well.
Add butter and using finger tips rub till mix resembles breadcrumbs.
Make a well and add syrup and egg.
Stop as soon as a ball has formed.
Cover and chill till ready to use or roll and use immediately.

170C for 14-18 mins

Vanilla Cookie Recipe

makes about 24 medium-sized cookies

200g unsalted soft butter

200g caster sugar
seeds from one vanilla pod or 2 tsp of best vanilla essence
1 egg, lightly beaten
400g plain flour
In the mixer with paddle attachment, cream the butter, sugar and vanilla till well mixed and just creamy in texture. Do not overwork or cookies will spread during baking.

Beat in the egg till well combined.

Add the  flour and mix on low speed until a dough forms.
Cover with cling and place in fridge for at least 1 hour.
Place dough on floured surface and knead briefly.
Roll out to 5mm thick.
Cut out your shapes, then, using a palette knife, lay them on a baking tray lined with greaseproof paper.
Chill again for about 30 mins.
Preheat oven to 180C/170C fan and bake for about 10 mins, depending on size, until golden brown at the edges.
Transfer cookies to a wire rack and allow to cool before decorating.

Gingerbread Cookie Recipe

makes about 24 medium-sized cookies
90g butter
150g soft brown sugar
90g golden/corn syrup
425g Plain flour
1 tsp baking powder
2tsp ground ginger
1tsp mixed spice
1 medium egg (beaten)
Gently heat butter, sugar and syrup until dissolved.
Cool slightly for five mins.
Pre-heat oven 180C and lightly grease baking trays.
Sift flour, baking powder and spices tog into mixing bowl and make a well in centre.
Add melted mixture and egg into the centre. Bind tog with knife then use hands to form soft dough.
Sprinkle work surface with flour and roll out the gingerbread to 3mm (1/8″)

Bake in centre of oven for 13 mins.

Transfer cooked gingerbread to a cooling rack.
I have been using a homemade Cookie Leveller to roll out my cookie dough. I have all the instructions if you would like to make one.
Cookie Leveller click here
 

Royal Icing Recipe click here

A thicker consistancy icing is used to outline the cookie shape and then a thinner one (like custard) to fill in.

Outlining

Outline your cookies first and leave at least 15 minutes before you flood the inside of the ‘dam’ (outline). If the outline is a dark colour, it is best to wait 24 hours so that the colours don’t bleed into each other.
Outlining the egg
To outline the cookie hold the bag at 45 degrees and position the tip on your cookie. Put enough pressure on the bag so that the icing comes out and you can start moving in the direction that you want your icing to go. Start lifting the pipping bag till it is a few centimetres above your cookie and the icing just falls in a continuous line onto the cookie below. Come back closer to the cookie at corners and when finishing also reduce or stop pressure on the bag to go more slowly or to stop.

Flooding

Use a number 3,4 or 5 sized piping tip depending on the size of your cookie. Fill in one area at a time quickly zig zagging back and forth. Don’t worry if you haven’t filled in every spot: speed is more important at this point. To fill in these little missed bits just use your piping tip, toothpick or small paintbrush (used only for food), to push the icing into your missed bits.
Using a squeezy bottle to fill in with icing
Using a toothpick to fill in the missing bits

Decorating

Bunnies with White Tummies
Outline and flood your bunny with your chosen colour and immediately add a circle of white icing for the tummy. The icing will quickly sink down till a smooth or slightly domed tummy area remains.
Once completely dry add cheeks and front paws.
Add nose and eyes once cheeks are dry or almost dry.

Bunnies with Spots 

Outline and flood your bunny with your chosen colour and immediately add little blobs of white icing to make the dots.
Once completely dry add the bow using a No.00 piping nozzle.  
Pretty Little Easter Eggs
Outline and flood your eggs with your chosen colour and immediately add little blobs of white icing to make the dots.
Once completely dry add the bow using a No.00 piping nozzle.
Yellow Chicks
Outline and flood your chicks with yellow and when completely dry add little feather details, a pink beak and an eye.
Bunny Faces
Outline and flood each face with your chosen colour leaving the centre of the ears icing free.
Once dry add the cheeks in the same colour.
Once completely dry use a contrasting colour to make the nose, whiskers and middle ear. While still wet sprinkle the ears with coloured sugar sand or similar. If you are worried about the sprinkles sticking to the nose and whiskers you can add the nose and whiskers after the sprinkles have been added.
Finnish by making the eyes.

Storing

Let the cookies dry for 24 hours before you package them.
Store in an airtight container in a cool dry place out of the sun (sunlight can fade the colours). The cookies can keep for up to 2 months but I prefer to use them up within a month.