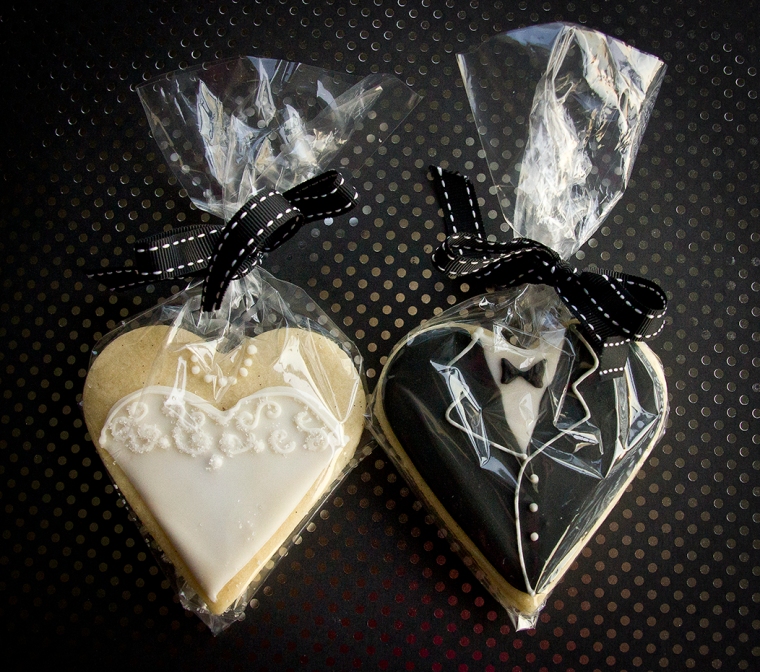
Simply the best wedding favours ever. These cute heart shaped Bride and Groom cookies are quite simple to make but can be quite time consuming so please leave yourself some extra time so that you don’t end up with a rushed job!
The recipe below is for 24 heart shaped vanilla iced cookies each 8 centimetres high. The cookies are iced using the ‘Outlining and Flooding’ technique which is simple to learn. The outline works as a dam or wall to hold the runny icing which you use to fill (flood) in the main parts of the cookie.

Vanilla Cookie recipe
200g unsalted soft butter
200g caster sugar
seeds from 2 vanilla pods
1 egg, lightly beaten
400g plain flour
- In the mixer with paddle attachment, cream the butter, sugar and vanilla till well mixed and just creamy in texture. Do not overwork or cookies will spread during baking.
- Beat in the egg till well combined.
- Add the flour and mix on low speed until a dough forms. Cover with cling and place in fridge for at least 1 hour.
- Place dough on floured surface and knead briefly.
- Roll out to 5mm thick.
- Cut out your heart shapes, then, using a palette knife, lay them on a baking tray lined with greaseproof paper. Chill again for about 30 mins.
- Preheat oven to 190C/170C fan and bake for 10-13 mins, until golden brown at the edges.
- Transfer cookies to a wire rack and allow to cool before decorating.
Royal Icing recipe
270g pure icing sugar, sifted
4 drops acetic acid
1 egg white
- Beat icing sugar, acetic acid and egg white with electric beaters on slow to begin then medium for 4 minutes for soft peaks.
- Divide the icing between two bowls with airtight lids. Place lids on until required as icing dries out very quickly.
- Add white colour and black colour to respective bowls and mix to required depth of colour. I used Americolor gel colour.
- Add water (a 1/4 tsp at a time) and stir until you reach the thick or ‘outline’ consistancy. To test the consistency just drag the tip of s knife through the surface of your icing, letting the knife go about one inch deep and count to 10. If the surface of the icing smooths over in approximately 10 seconds then your icing is ready to use. If it takes longer, the icing is too thick. add more water. if your icing surface smooths over in less than 7 seconds, it is too runny. Add more icing sugar.
- When your icing is the right consistency ( i.e. smoothing over in 10 seconds) place a quarter of the icing in a piping bag with a small tip number 0 or 1.
- Add more water to the remaining icing till it smooths over in 2 – 5 seconds then pour the remaining icing into a squeezy bottle.


Outlining
Outline your cookies first and leave at least 15 minutes before you flood the inside of the ‘dam’ (outline). When putting light and dark shades together as we are here (black and white), it is best to wait a few hours in-between so that the colours don’t bleed into each other.
To outline the cookie hold the bag at 45 degrees and position the tip on your cookie. Put enough pressure on the bag so that the icing comes out and you can start moving in the direction that you want your icing to go. Start lifting the piping bag till it is a few centimetres above your cookie and the icing just falls in a continuous line onto the cookie below. Come back closer to the cookie at corners and when finishing also reduce or stop pressure on the bag to go more slowly or to stop.


Flooding
Use a squeezy bottle with a large round hole number 3, 4 or 5 tip. Filling one area at a time quickly zig zagging back and forth. Don’t worry if you haven’t filled in every spot: speed is more important at this point. To fill in these little missed bits just use a cocktail stick to push the icing into your missed bits.


Use the same principles for outlining and flooding the ‘Groom’ cookies.


Storing
Let the cookies dry for 24 hours, if you possibly can, before you package them. Store in an airtight container in a cool dry place out of the sun (sunlight can fade your coloured icing, especially black icing). The cookies can be kept for up to 2 weeks and longer if heat sealed in food grade cello bags.


These are amazing! I would love to make some for our wedding sweet table but not sure if I’d have patience in the week leading up…
I admit that they do take patience but on the up side you only have 2 colours of icing to prepare. Maybe you could ask a good friend to help, even if only to bag them and tie the ribbons on. Good luck!
Bernice